
Go to part two of the install
Go to part three of the install
Click Here to see a video tour of the solar installation.
Here are the Amazon links to the flexible panels I used if you want to research them further.
1 – Go Power! (GP-FLEX-200) 200W Flexible Solar Kit with 30 Amp PWM Solar Controller
3 – Go Power! (GP-FLEX-100E) 100W Flexible Mono Crystalline Solar Expansion Kit
We get a lot of questions on theVAP about solar. As everyone knows, who listens to the show, we don’t boondock much, so solar has never been a concern. With all the questions I wanted to learn more about it. After some research, I investigated Go Power! because of their Flex-Solar panels. A perfect solution for our beloved curved Airstreams!
At first I decided on one Solar-Flex 100W kit from Go Power!, but soon decided more is better. More on that later. 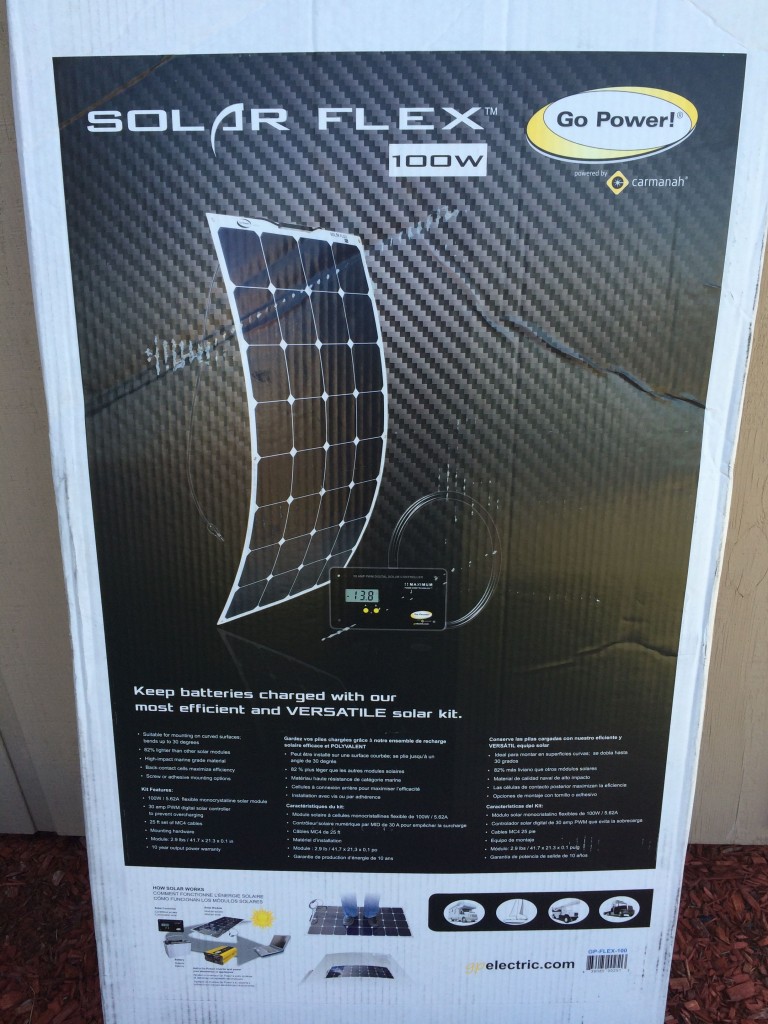
Go Power Solar-Flex 100W Panel
The kit is fairly simple. It includes the 100W panel, charger controller, and 50′ of MC4 cable. The first step is to determine where you are going to mount the panel, keeping in mind your entry point for the cables. The most common entry is the refrigerator vent, or a vent stack. Some may choose to make their own entry, especially if your trailer came pre-wired for solar. I opted for the fridge vent, because solar pre-wire wasn’t an option in 1960!
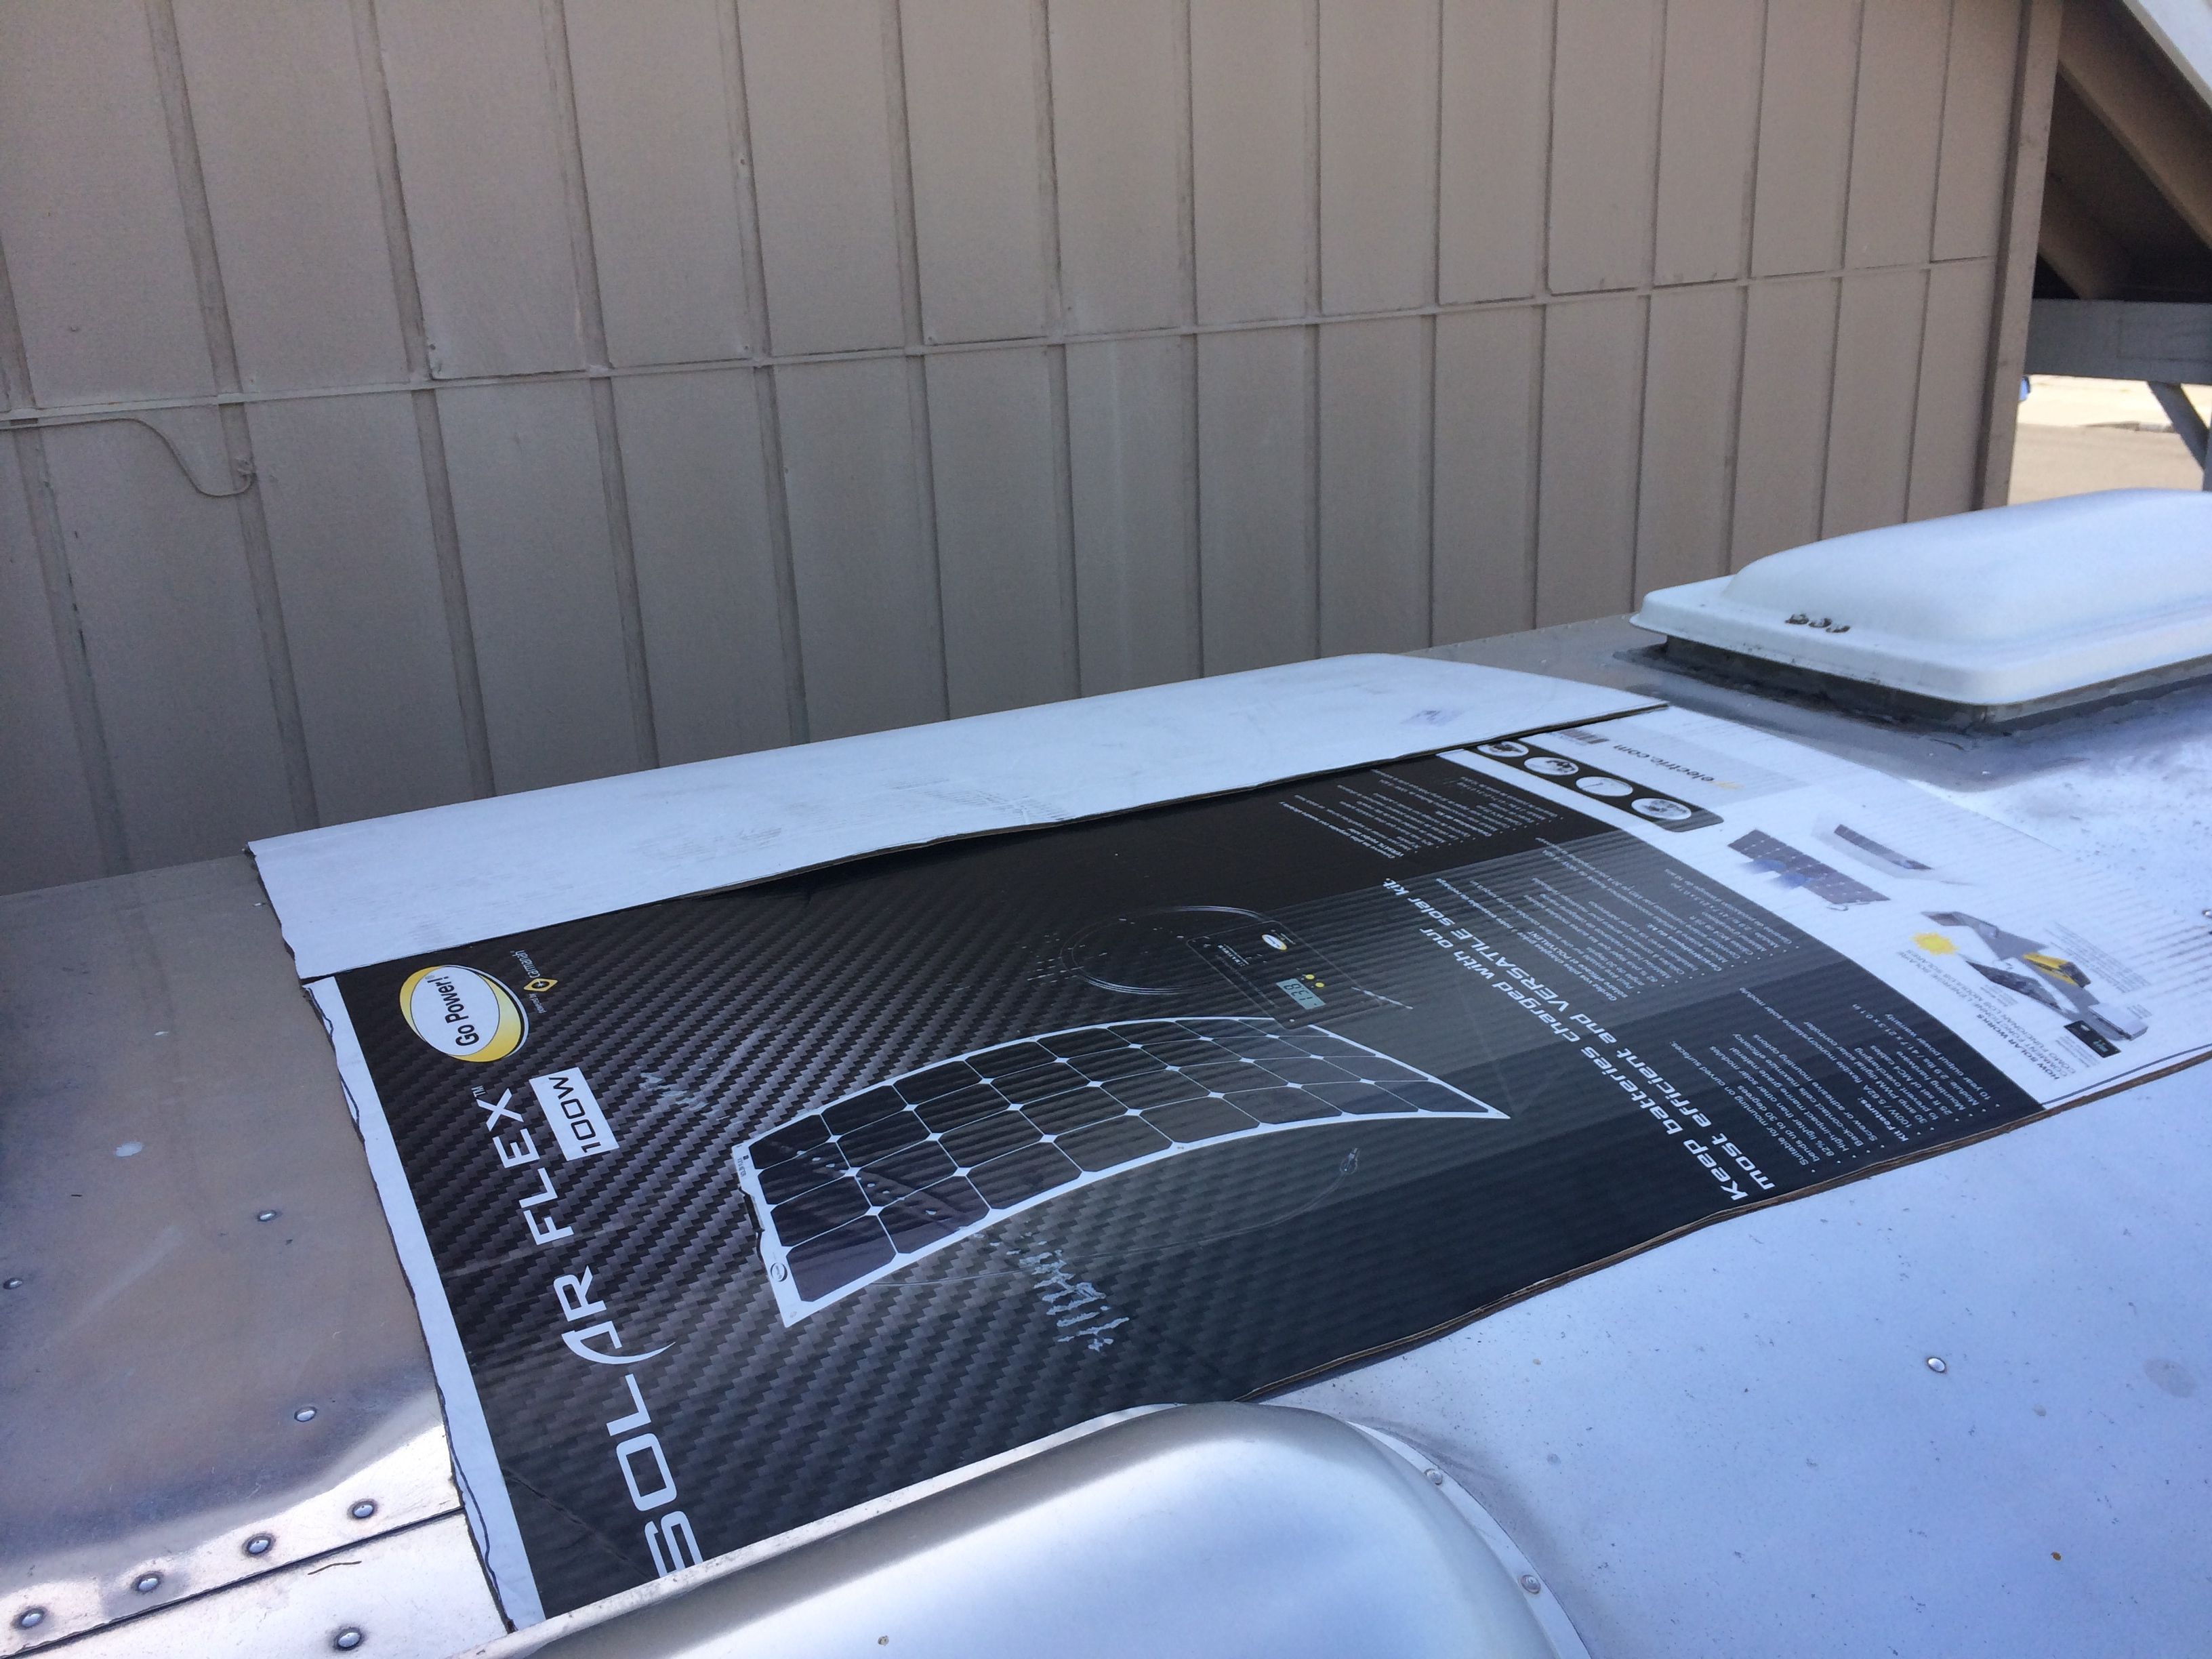
I used the box the kit came in to cut to a panel template and try different positions on the roof. You want to be mindful of objects that can cast a shadow on the panel, like an air conditioner or vent. Don’t drive yourself crazy here as there is only so much space on the roof to work with, but it’s smart to keep it in mind.  This is the perfect position for one 100W panel. There is no way you can see this from the ground. You can fit a second 100W panel on the front of a 28′ trailer for a total of 200W and be total solar stealth!
However, the included solar controller can handle 400W or four panels, which happens to be the exact amount of panels my roof can hold. As Tim the Tool Man would say, “More power!” 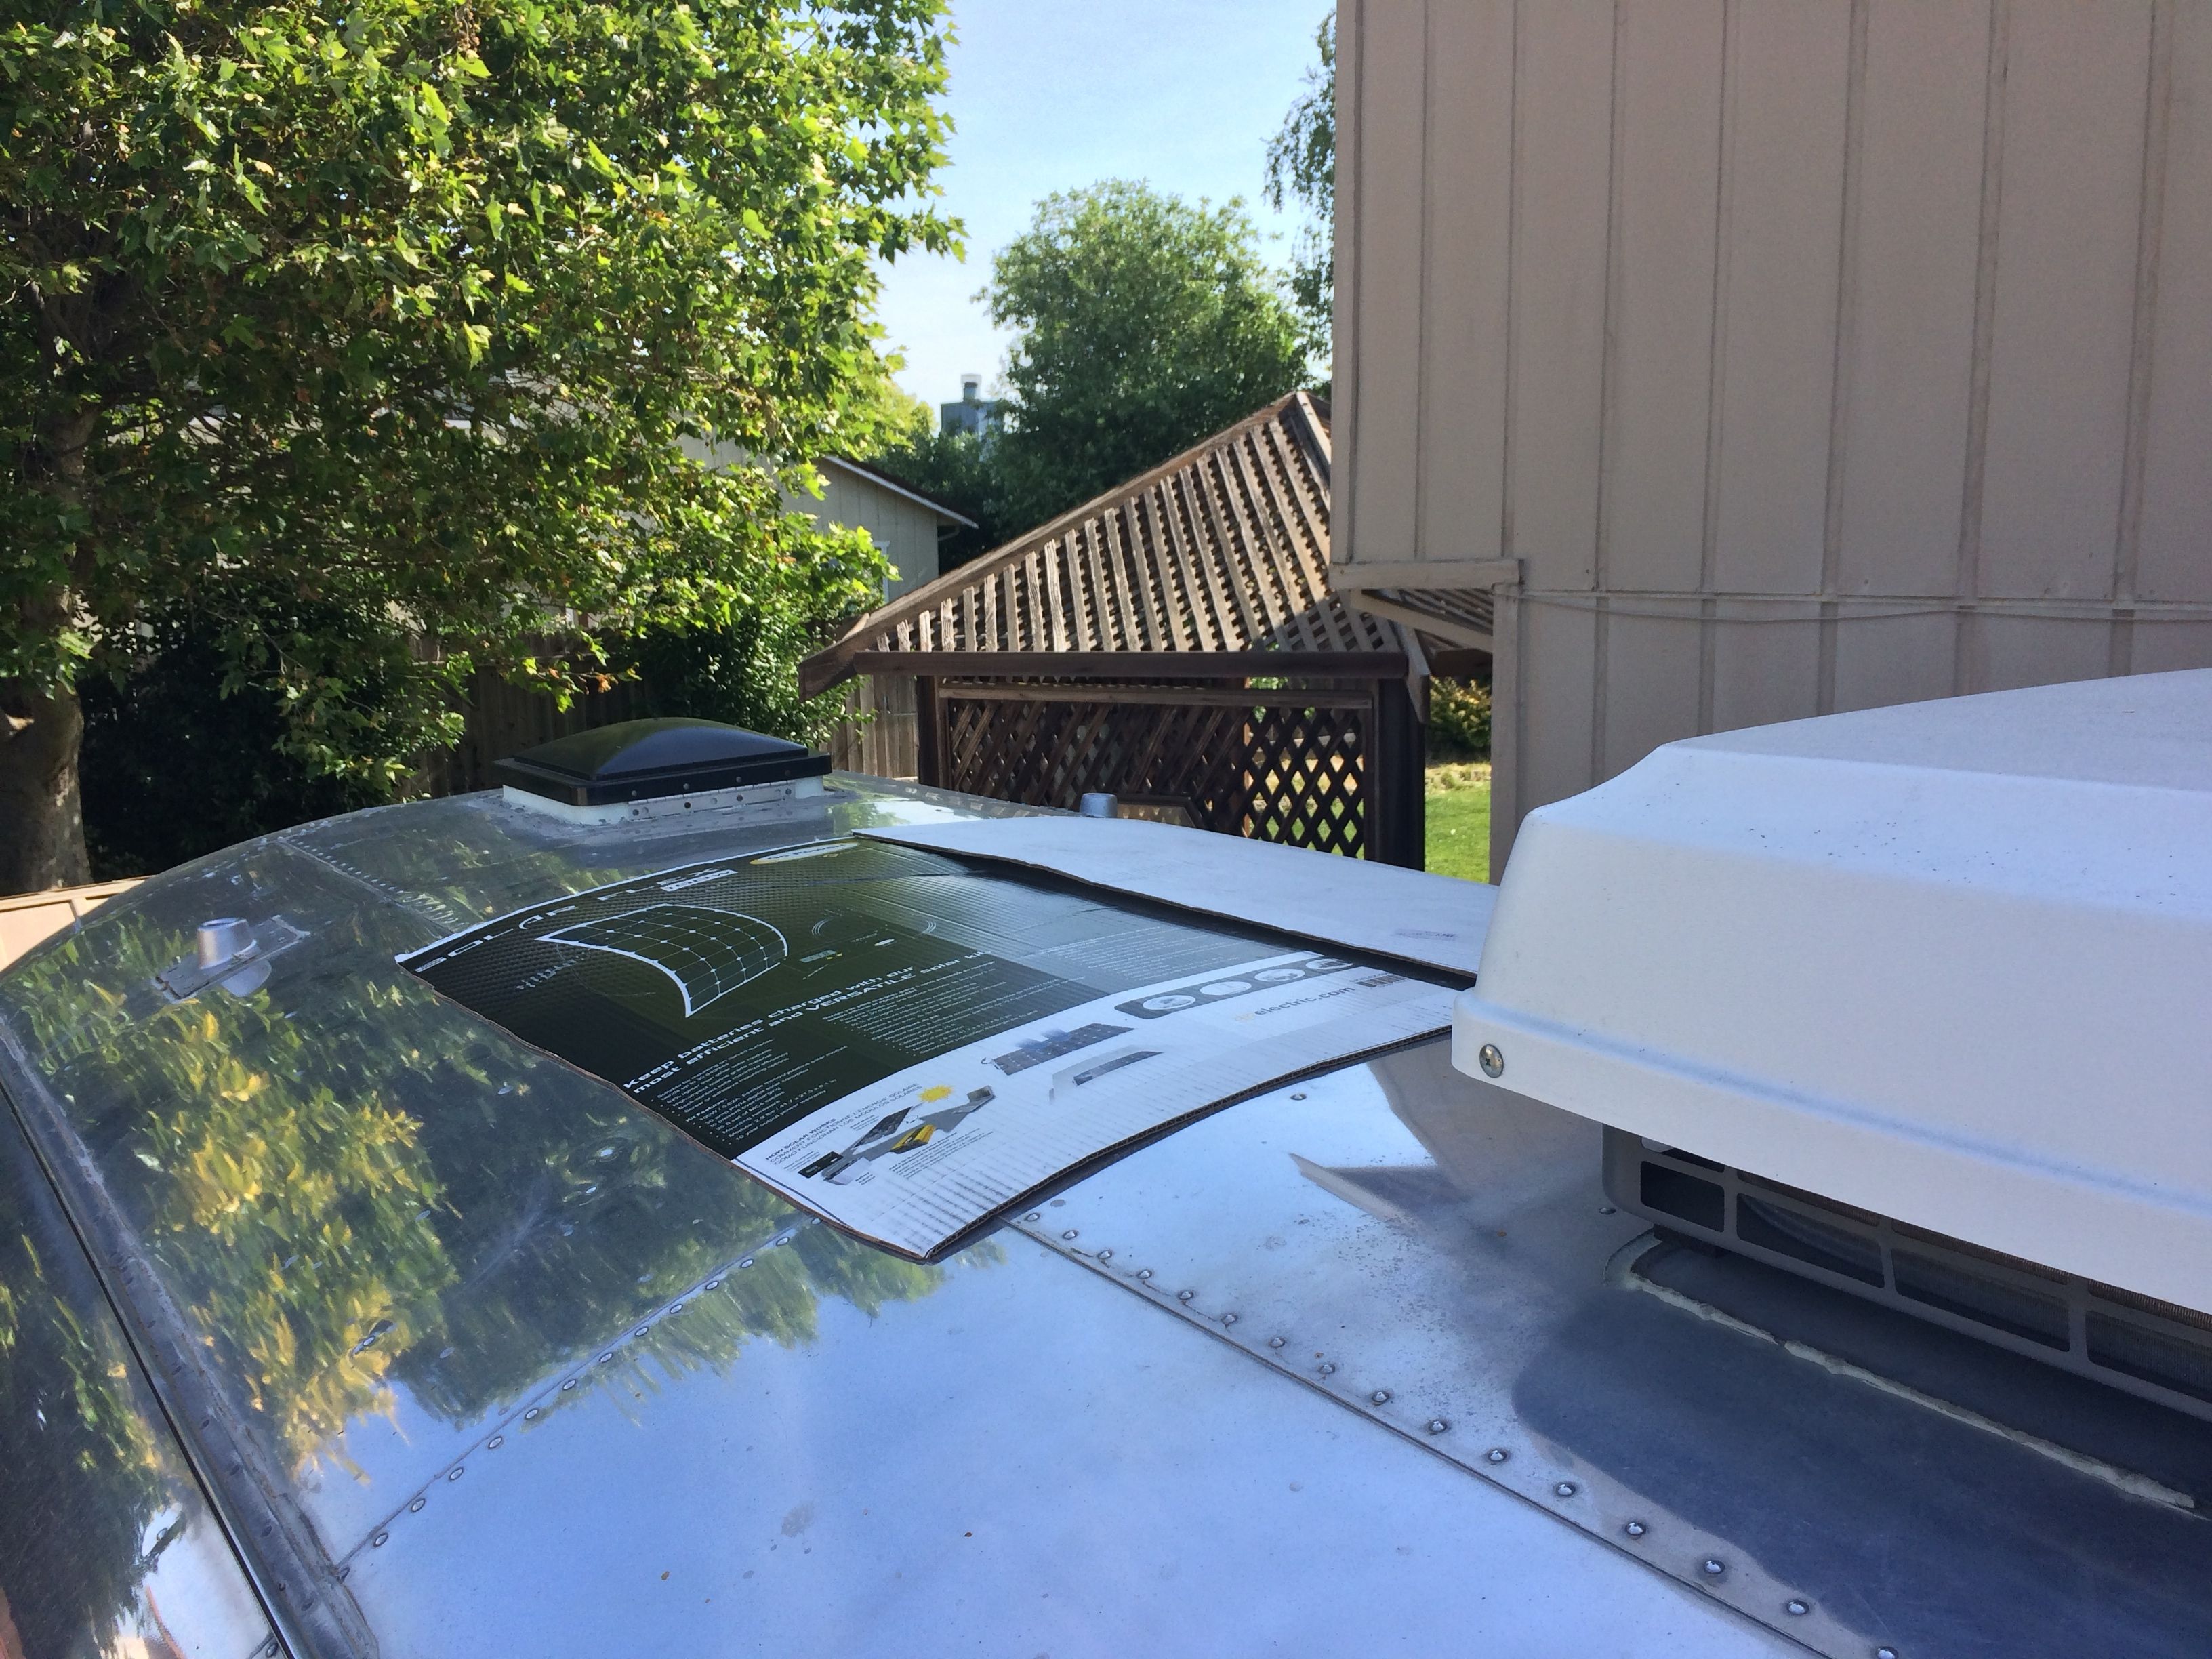
 With two panels on the front, and two on the back, I’m maxed out. The panels are 42″ long x 21″ wide. Which means they take up the same space no mater which way you turn them. It’s like a geographical anomaly!
Now that they cross over the top panel by 3.5″ on either side, you can see them a bit as you back from the trailer. It’s not that bad though, certainly better than the standard aluminum/glass panels that have to be mounted 1″ above the roof. They look like you’re hauling around a table for the smurfs! 🙂
I only have one panel now. I’m ordering three Solar Flex 100Es, which is the 100w panel expansion kit. These include the panel, cable and a special Y adapter to parallel the connections.
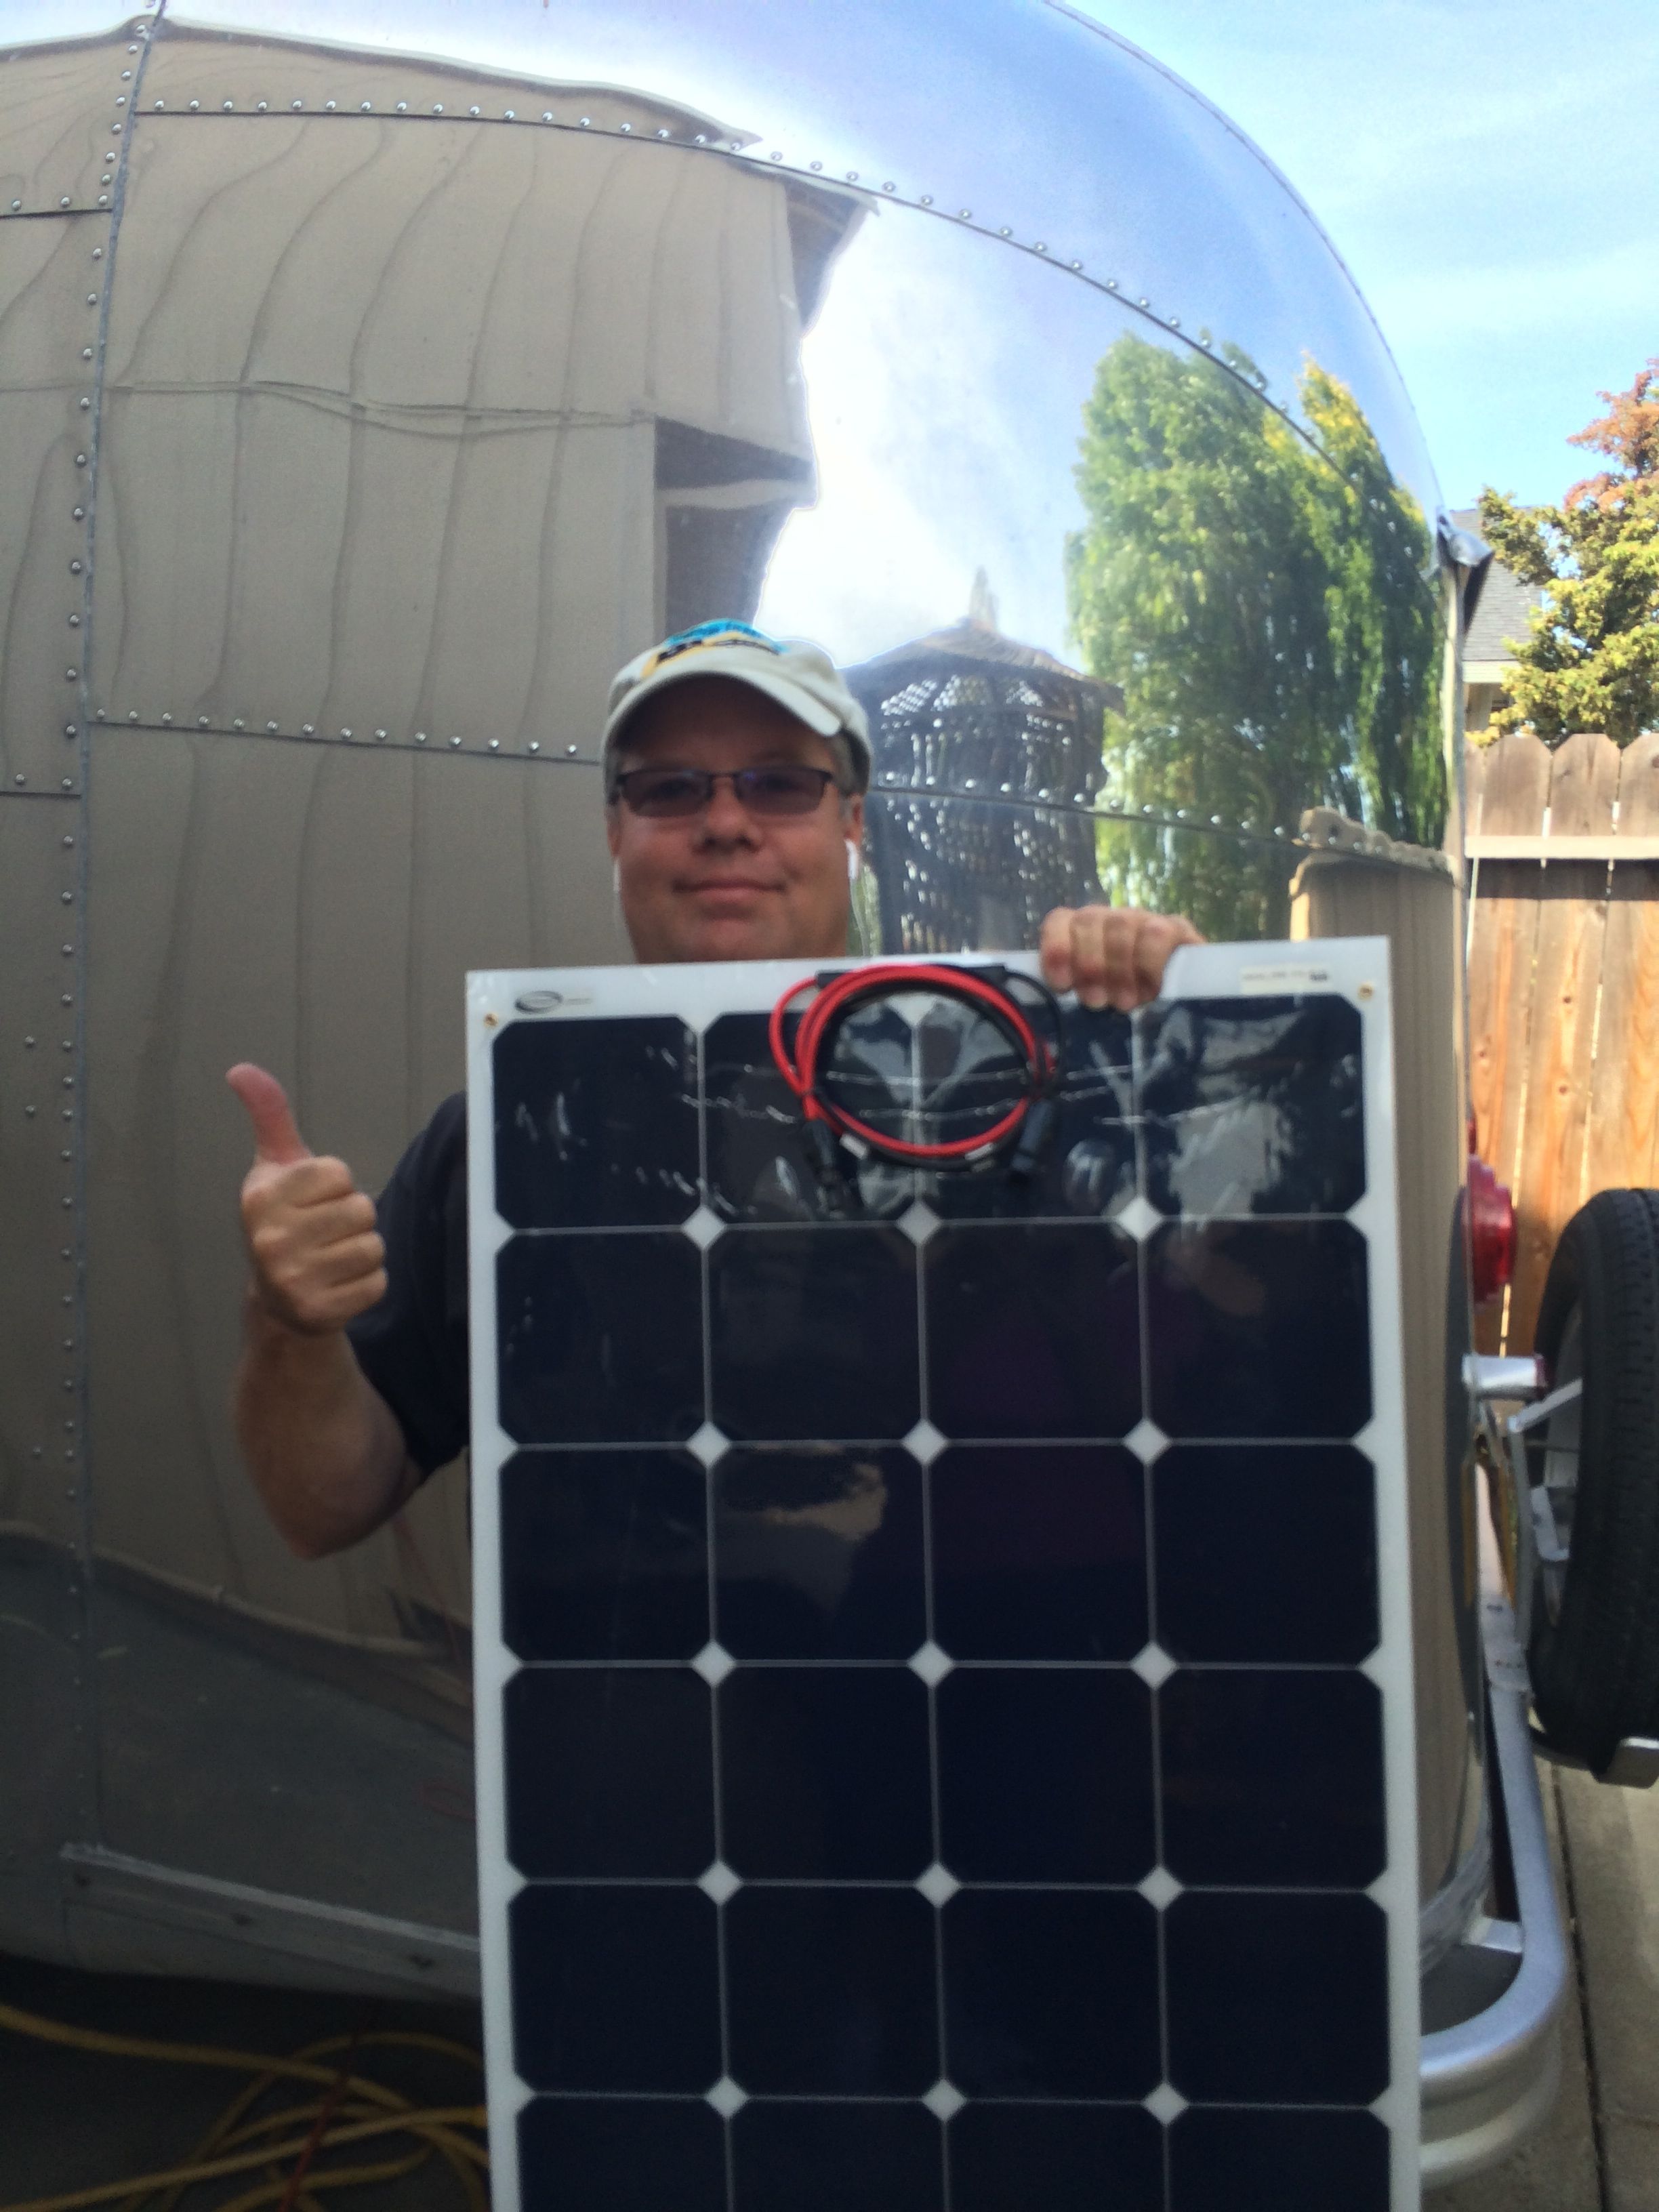
Go Power Solar-Flex panels can be installed with screws or adhesive. I opted for stainless bolts with rivnuts. A rivnut is a cool little gadget. It installs like a rivet, but leaves a threaded hole for a bolt. This way the panels can be removed easily if needed. After speaking with Go Power about my concern for wind getting under the panel while driving, they mentioned using Sikaflex around the perimeter, especially the front.

Rivnut installation tools

Installing the rivnut
 Before securing the panel, I gently roughed up the bottom perimeter of the panel so that it will adhere better to the sikaflex. I also took a photo of the panel spec’s for the nerds out there.
 Here is the panel mounted with the rivnuts, and to honest, I don’t like the way it turned out. Even trying to add the sikaflex would just make a mess.
 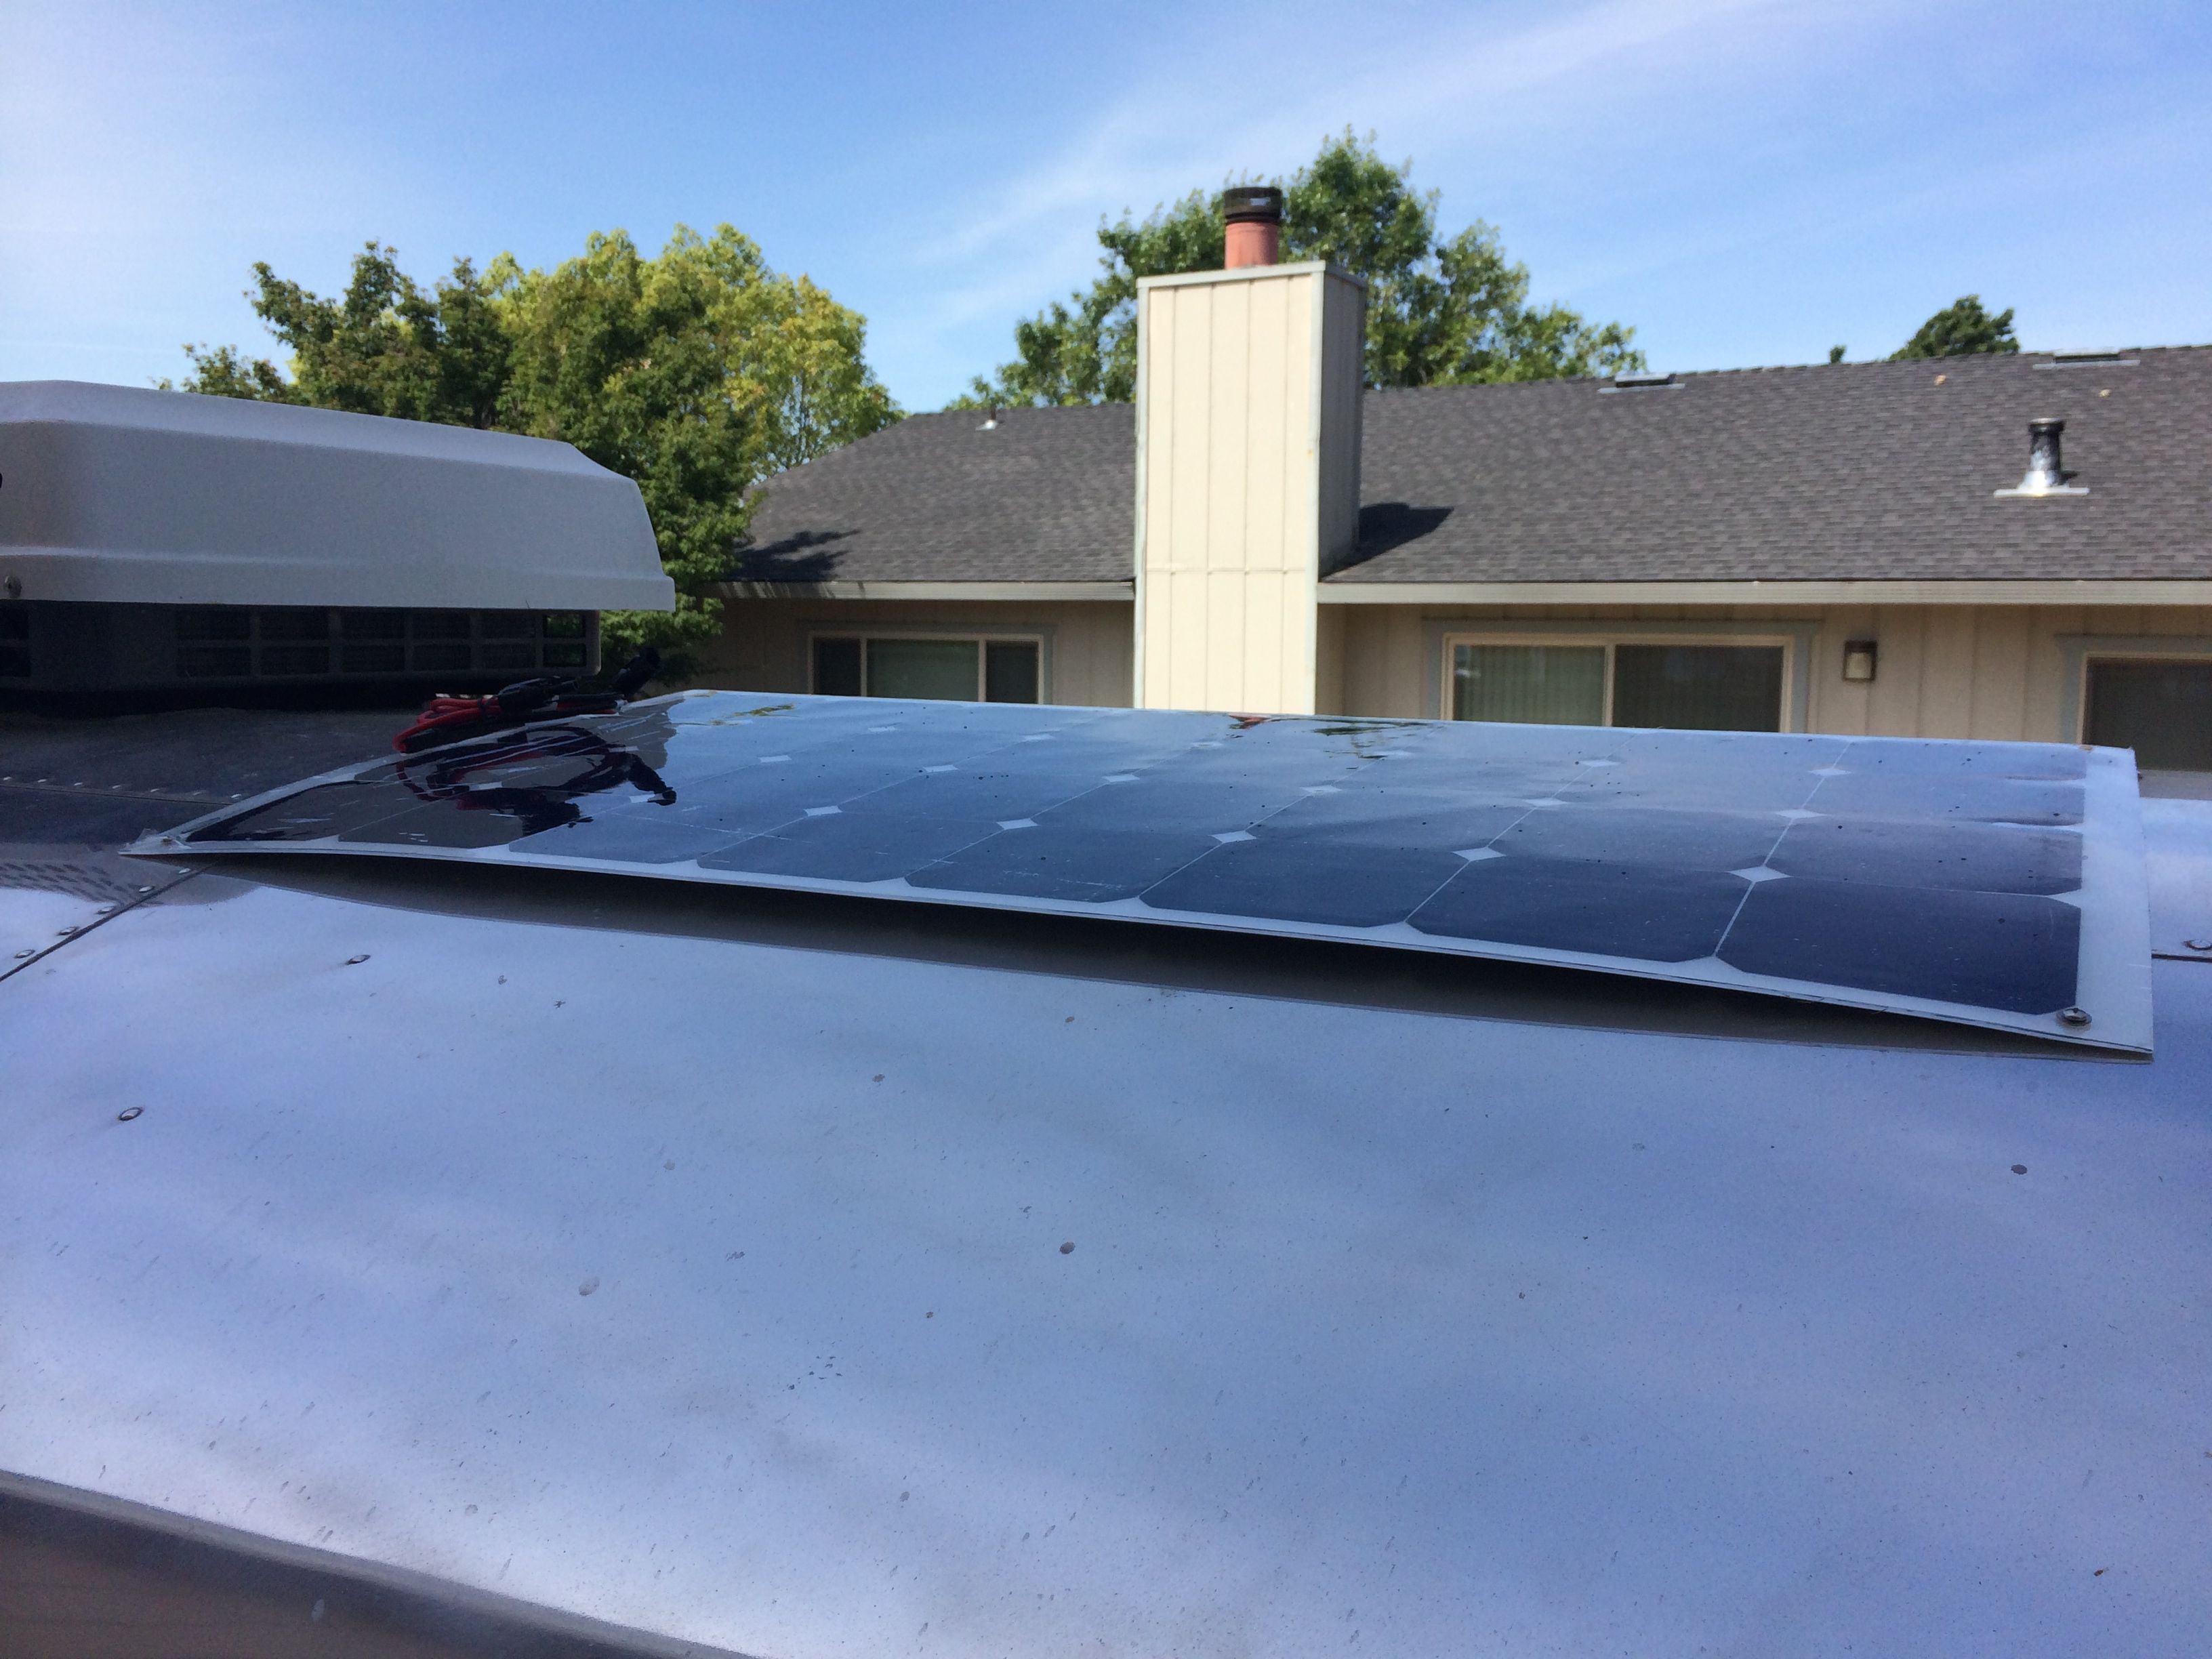 The bow is there for a couple of reasons. One is the fact that Go Power only put eyelets on the four corners. I think it would be a nice addition to have a third eyelet on the long sides. The second reason is probably just my alignment of the rivnuts. It’s a real chore to get them to line up perfectly under the 8/32″ eyelets. Come to think of it, it would be nice if the eyelets were a little larger and robust.
Anyway, I don’t like the bow or the trouble of the rivnut installation, so I started researching and found that a lot of installers use a special 3M tape called VHB tape. VHB, stands for Very High Bond. How creative…
Lew, who is a certified RV mechanic and hangs out on airforums.com, has a lot of experience installing solar. He recommends the 3M VHB tape. I’m going to order some 3M VHB Heavy Duty Mounting Tape 4941. This should hold down all the edges. I’ll also use stainless screws in the eyelets.

3M VHB Heavy Duty Mounting Tape 4941
I’m going to have two panels up front, and two behind the air conditioner. I decided the best place to bring the wire into the Airstream was via the fridge vent. The kit includes #10 MC4 cable, which the manual said is good for up to 240W’s and 25′.
Since I am going to have 400W and slightly over 25′ run, I decided to install #6 wire. The wiring coming from the solar panel uses special connectors that come in the kit. You still use this to enter the trailer. The included cable is UV rated and very flexible. You don’t want just any old wire on the roof in the sun all day.
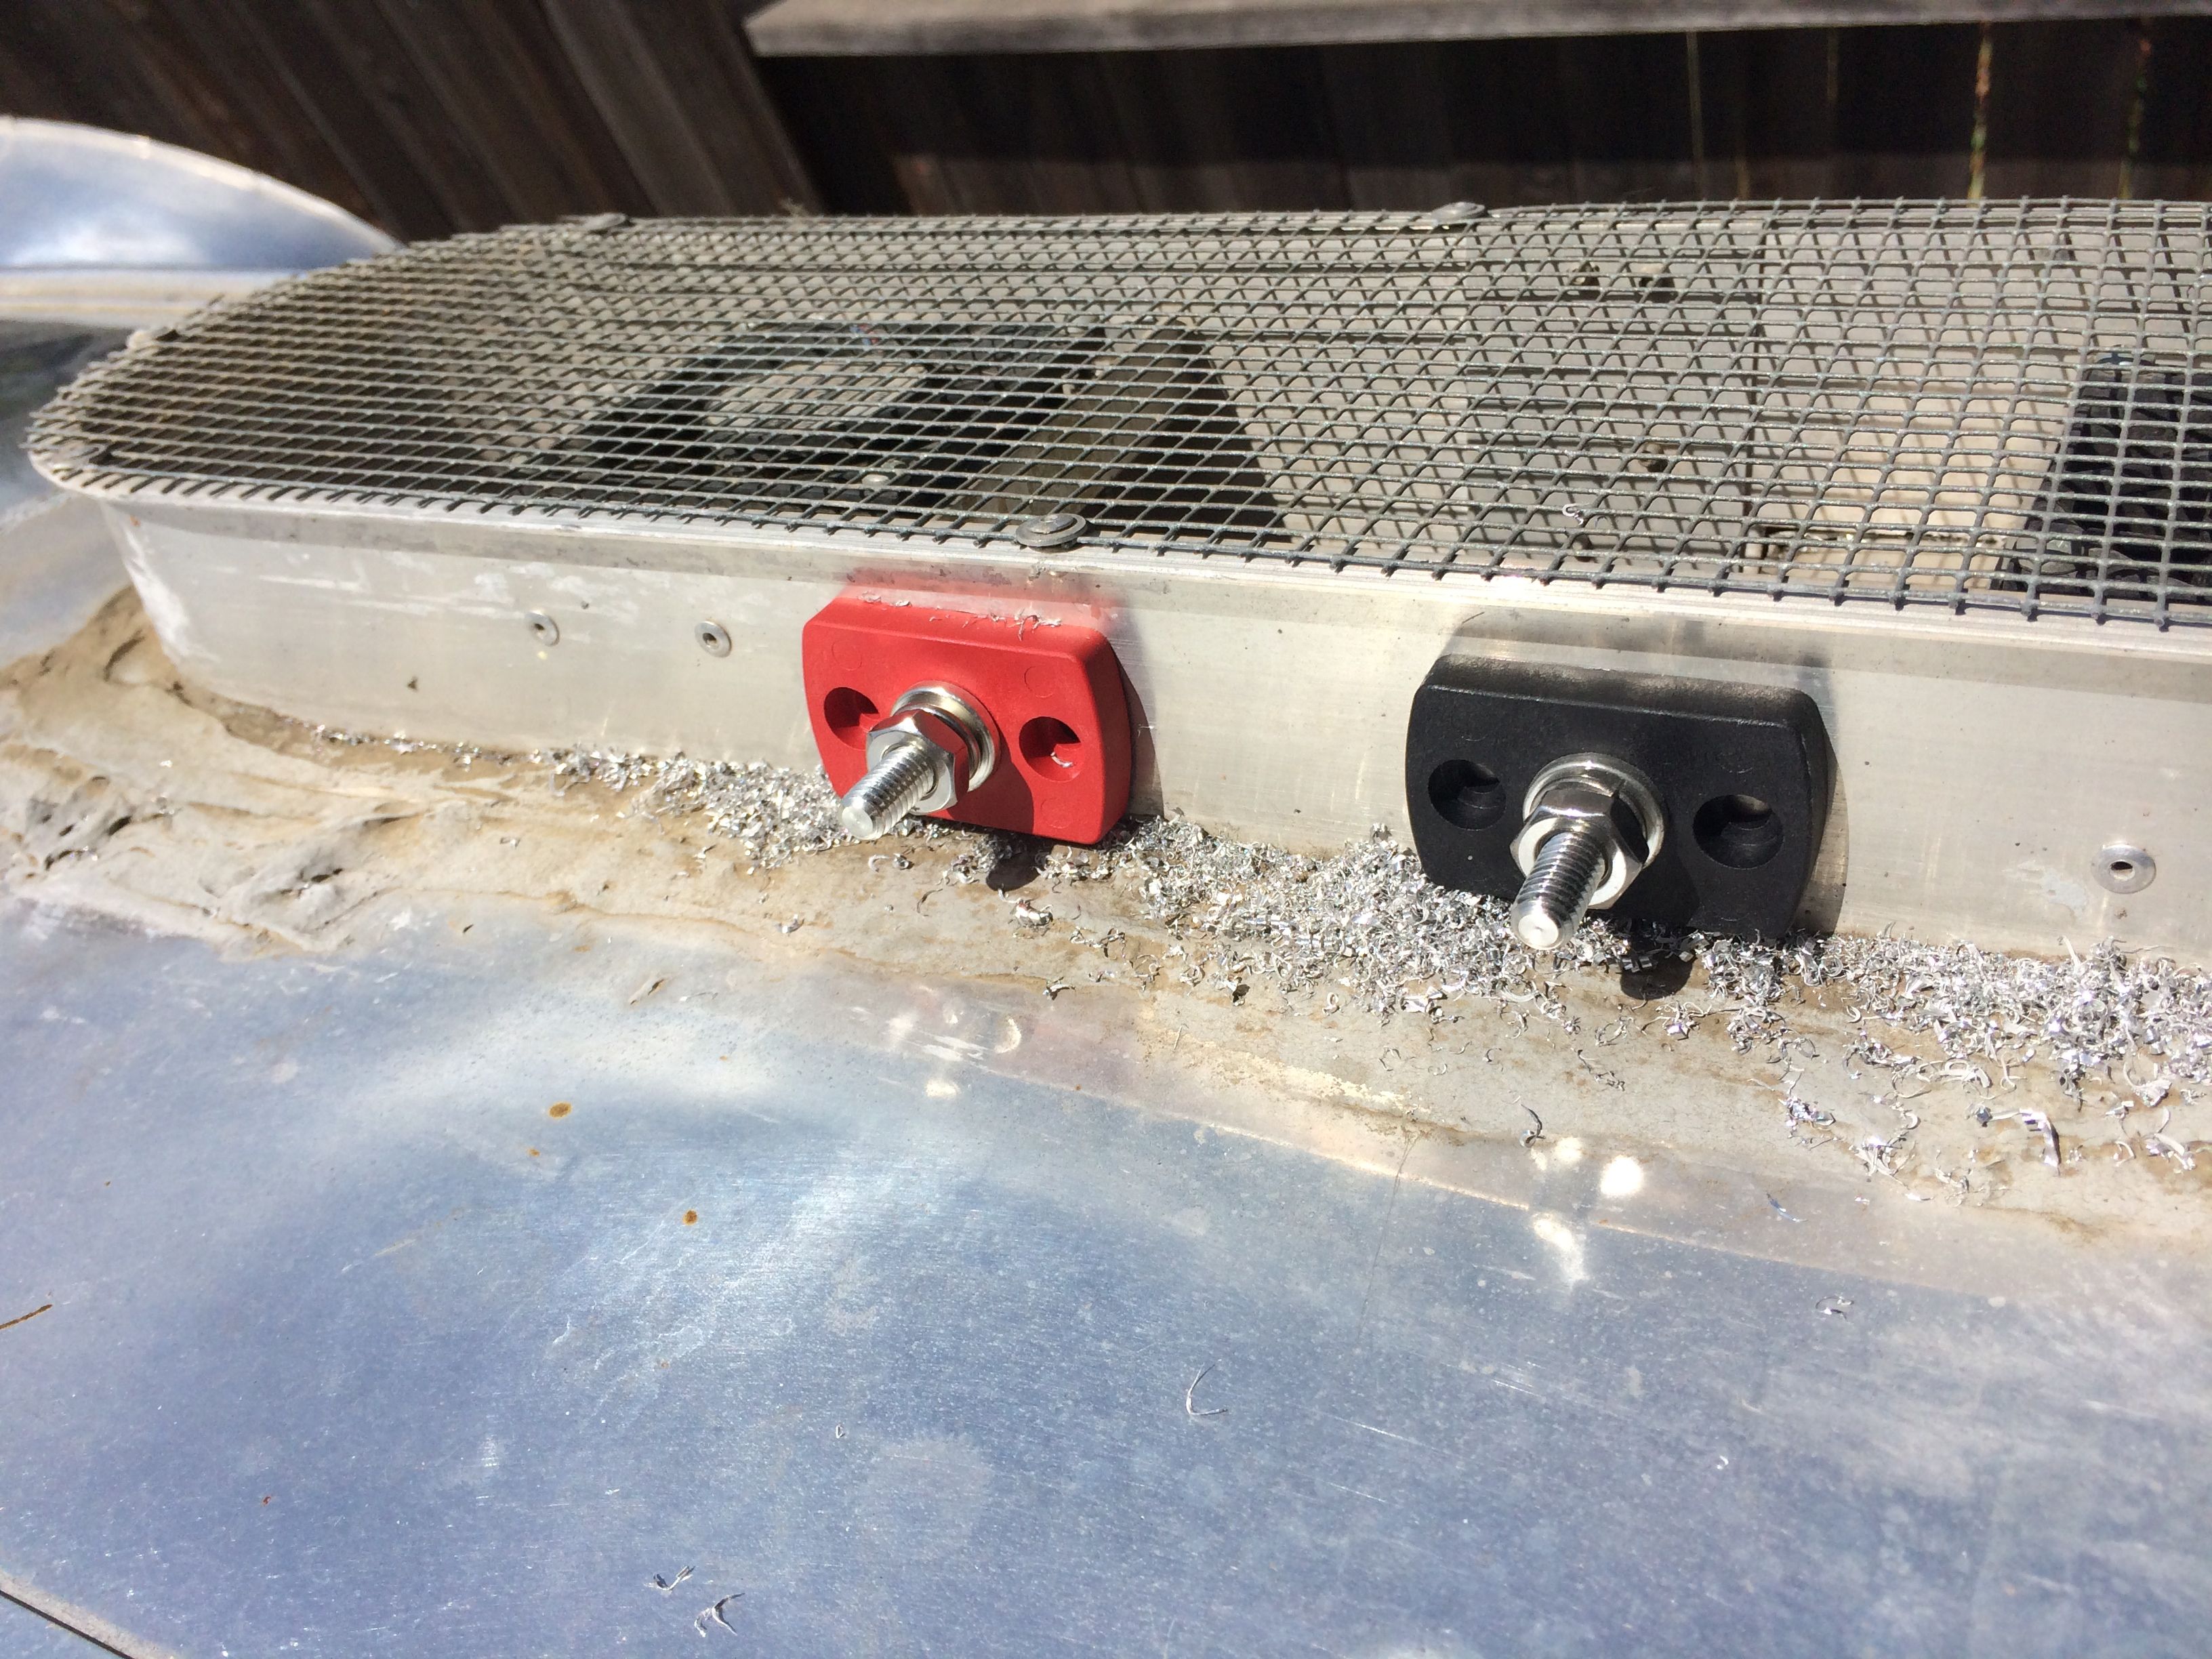
If you go with two 100W panels, they connect together and run into the trailer on the same single pair. It only gets slightly more complicated when you go over two panels. You need some sort of junction box on the roof. I opted to use Blue Sea marine feed-through bulkhead connectors. These things are great quality, made from thermoplastic with a 5/16″ bolt for the wire.  Next I had to remove my fridge vent cover to allow access for mounting the bulkhead connectors and run the wire. I dry fitted the Blue Sea’s and they look great.
Red Bulkhead at Amazon
Black Bulkhead at Amazon
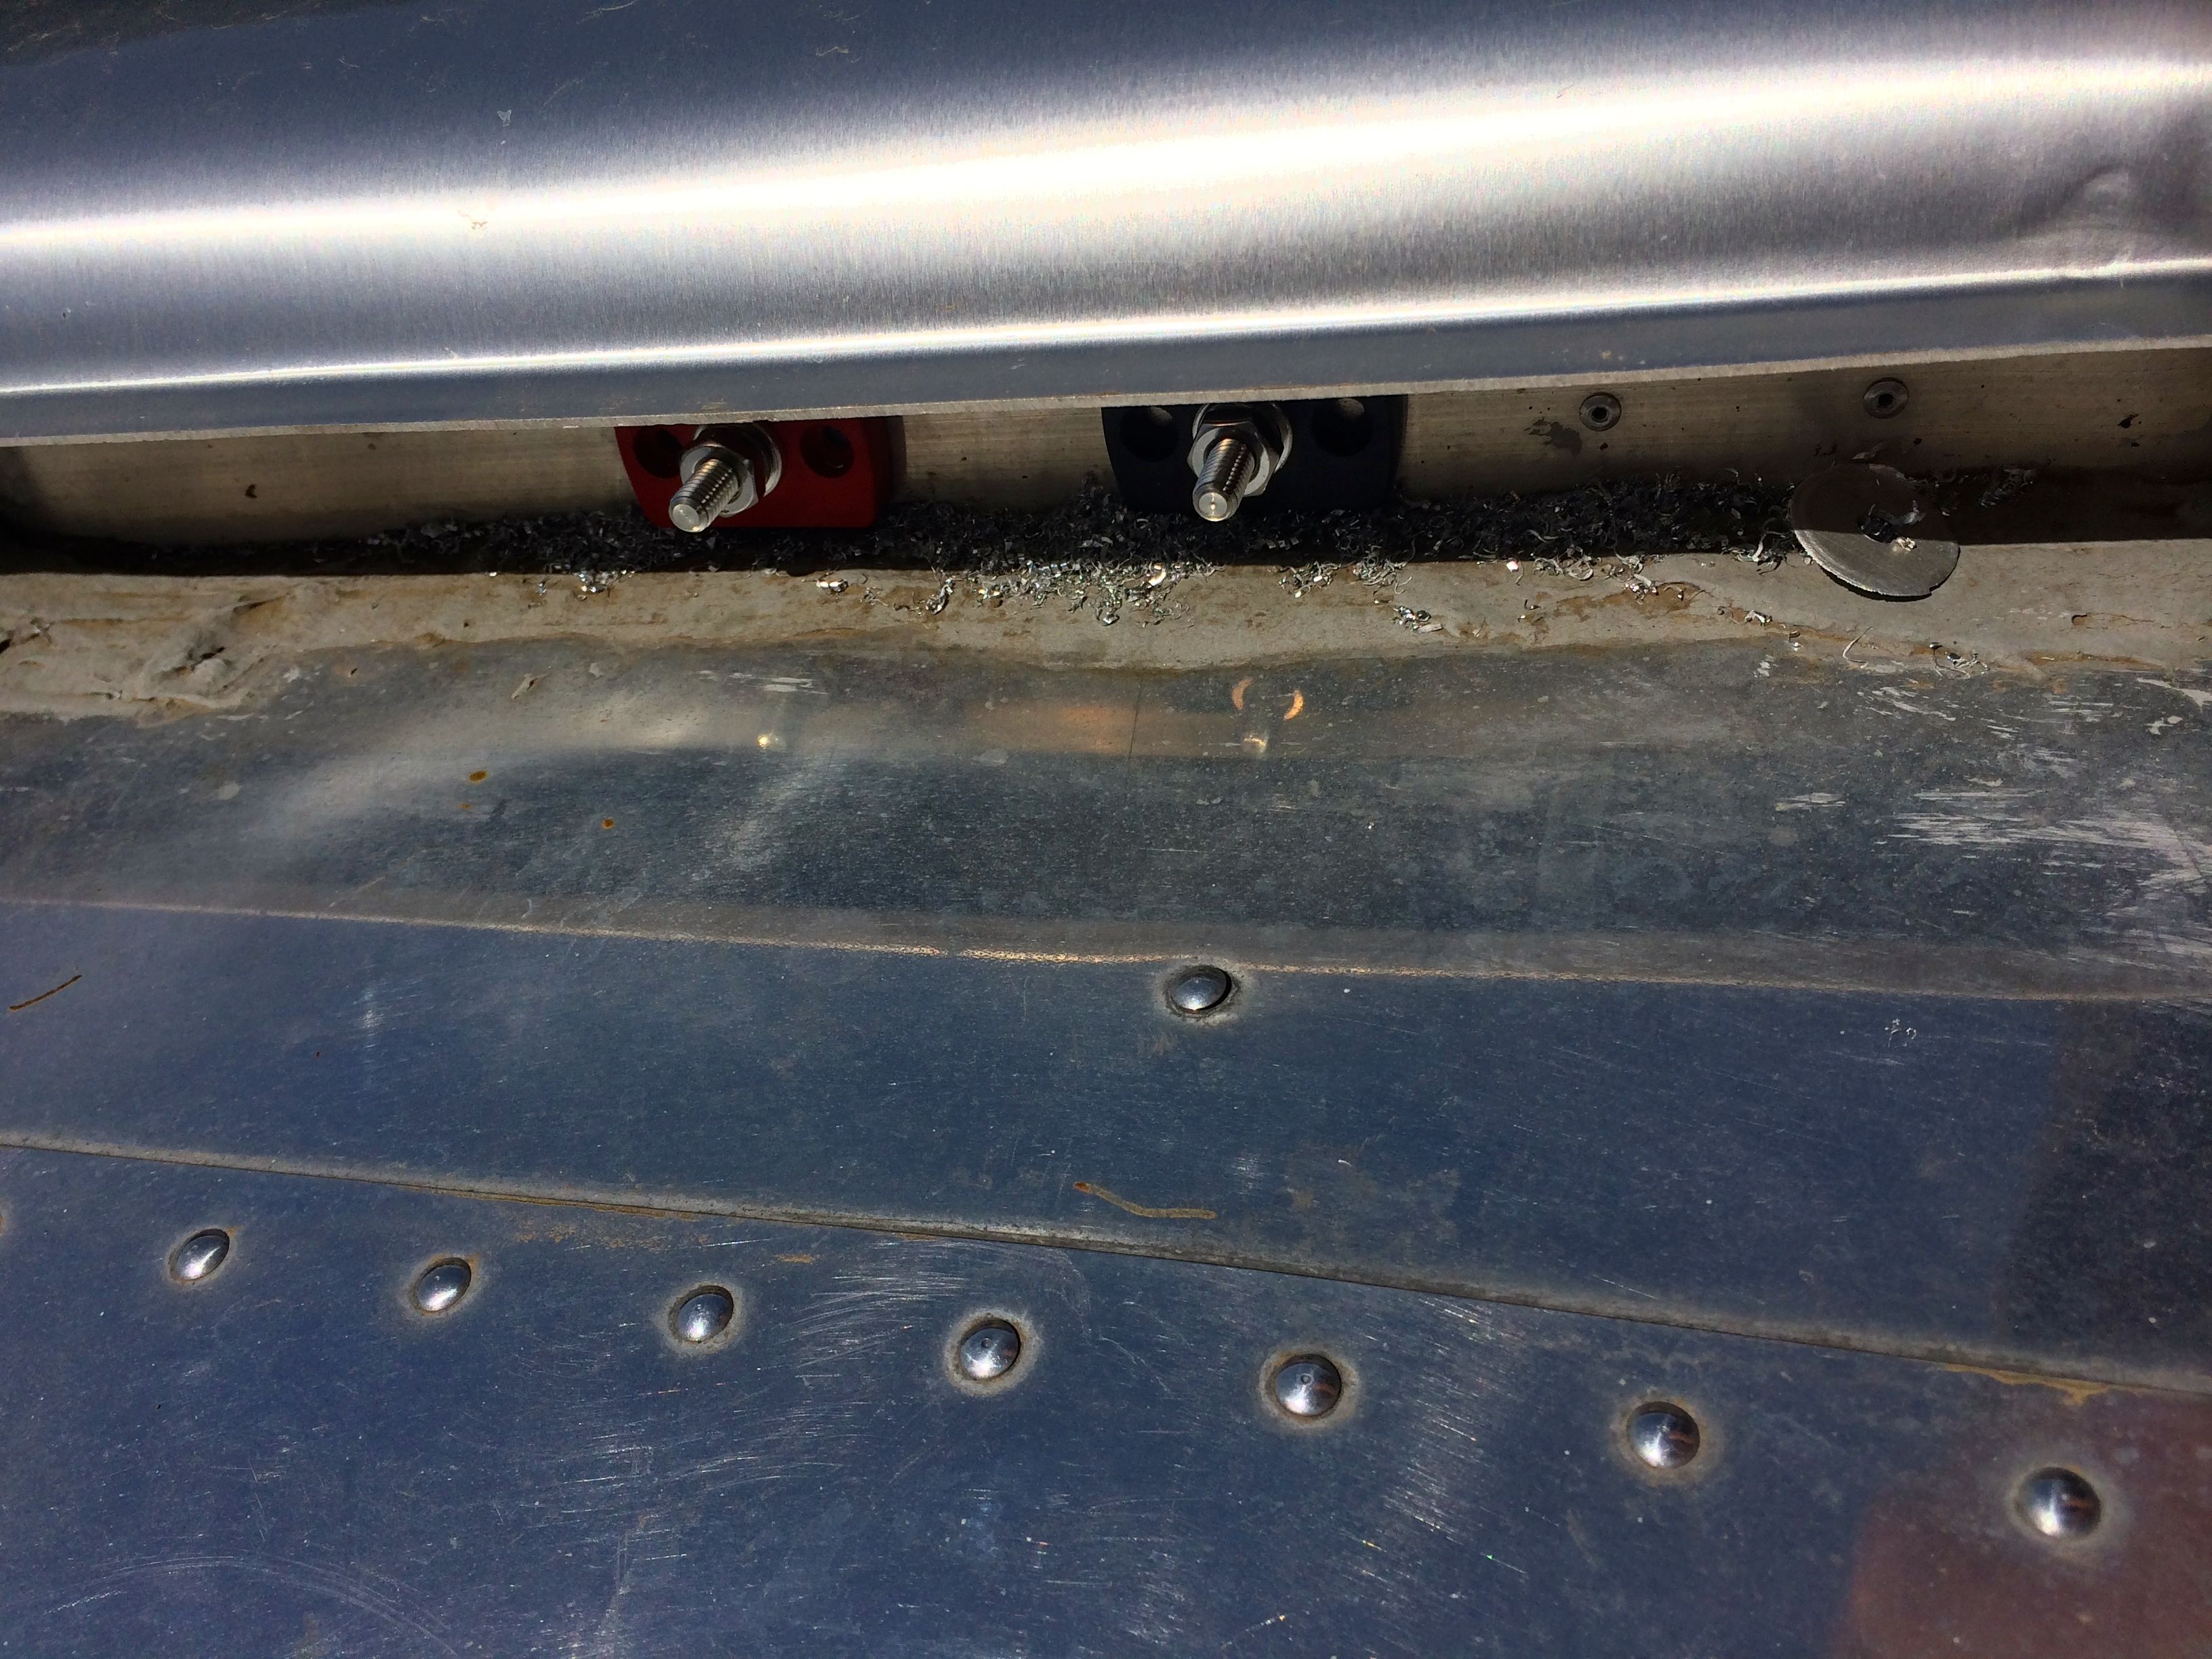 I purchased some 5/16″ plastic caps that will go over the bolts once I’m finished.
I’ll save you the part about running the #6 Home Depot wire. Lets just say it’s lack of flexibility made it tough. Next time I’d go with a high-strand count wire, much more flexible!  Here is the #6 stranded wire connection at the bulkhead connectors. They were crimped and soldered. I took a lot of time to add some heavy duty strain relief. I know how much things bounce around in these trailers.
It’s important during all of this wiring to keep the solar panel disconnected until the end. You don’t want to accidentally short the wires from the panel in full sunlight as you can short out the internal diode in the panel. Carefully check all of your wiring for shorts and polarity issues.
Back on the roof I connected the UV rated MC4 cable that I routed around the A/C to the bulkhead connectors. The panel is still disconnected at this point.
 You may noticed that I used aluminum tape to hold down the wiring. I was mentioning to Colin about needing to screw nylon clamps to hold the wires in place. Colin says he used aluminum tape for this sort of thing all the time as it doesn’t deteriorate. If it’s good enough for Colin…. 🙂
 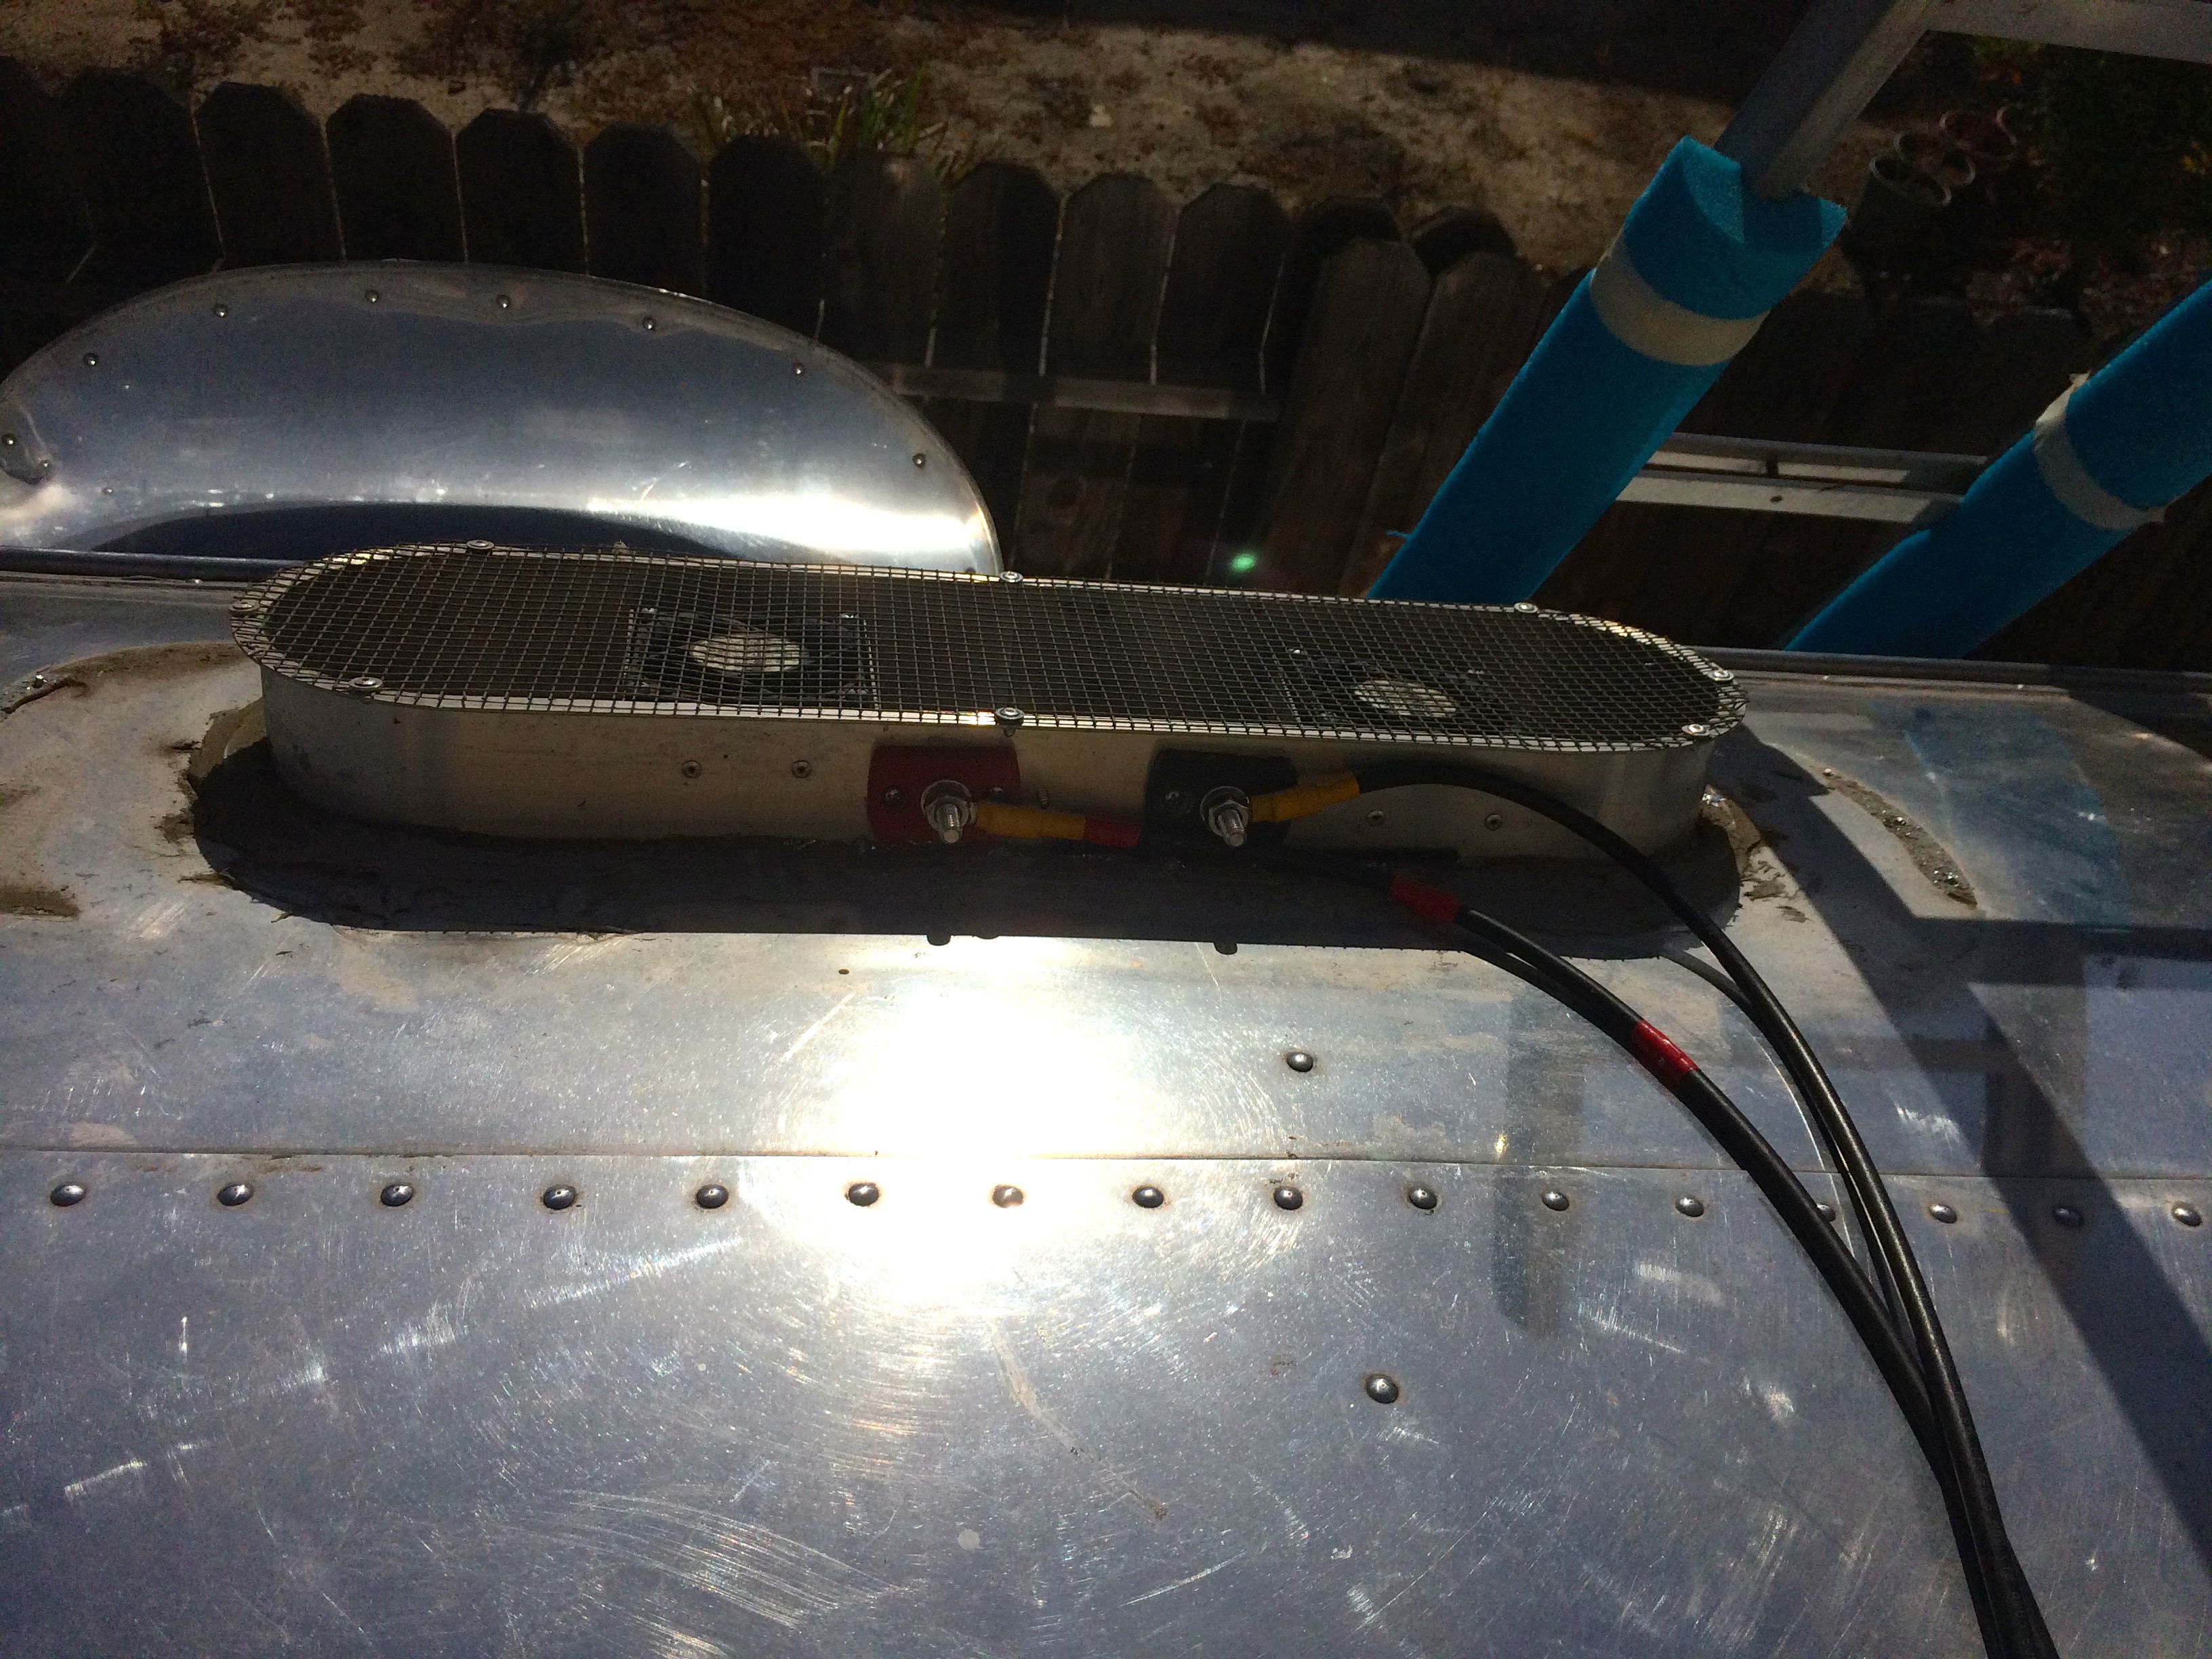 I ran the entrance cable back to the solar controller. The #6 is too big and stiff to connect directly to the controller, so I connected a couple of feet of the flexible #10 MC4 cable before connecting to the controller. This makes mounting the controller far easier and more reliable. I’m not worried about the power loss going from #6 to the #10 since the #10 is only a couple of feet. It’s a far better solution for the health of the controller.
I also used sections of the MC4 cable to connect the controller to the battery via the included 30 amp fuse holder. Again, this is a very short run from the controller to the battery. 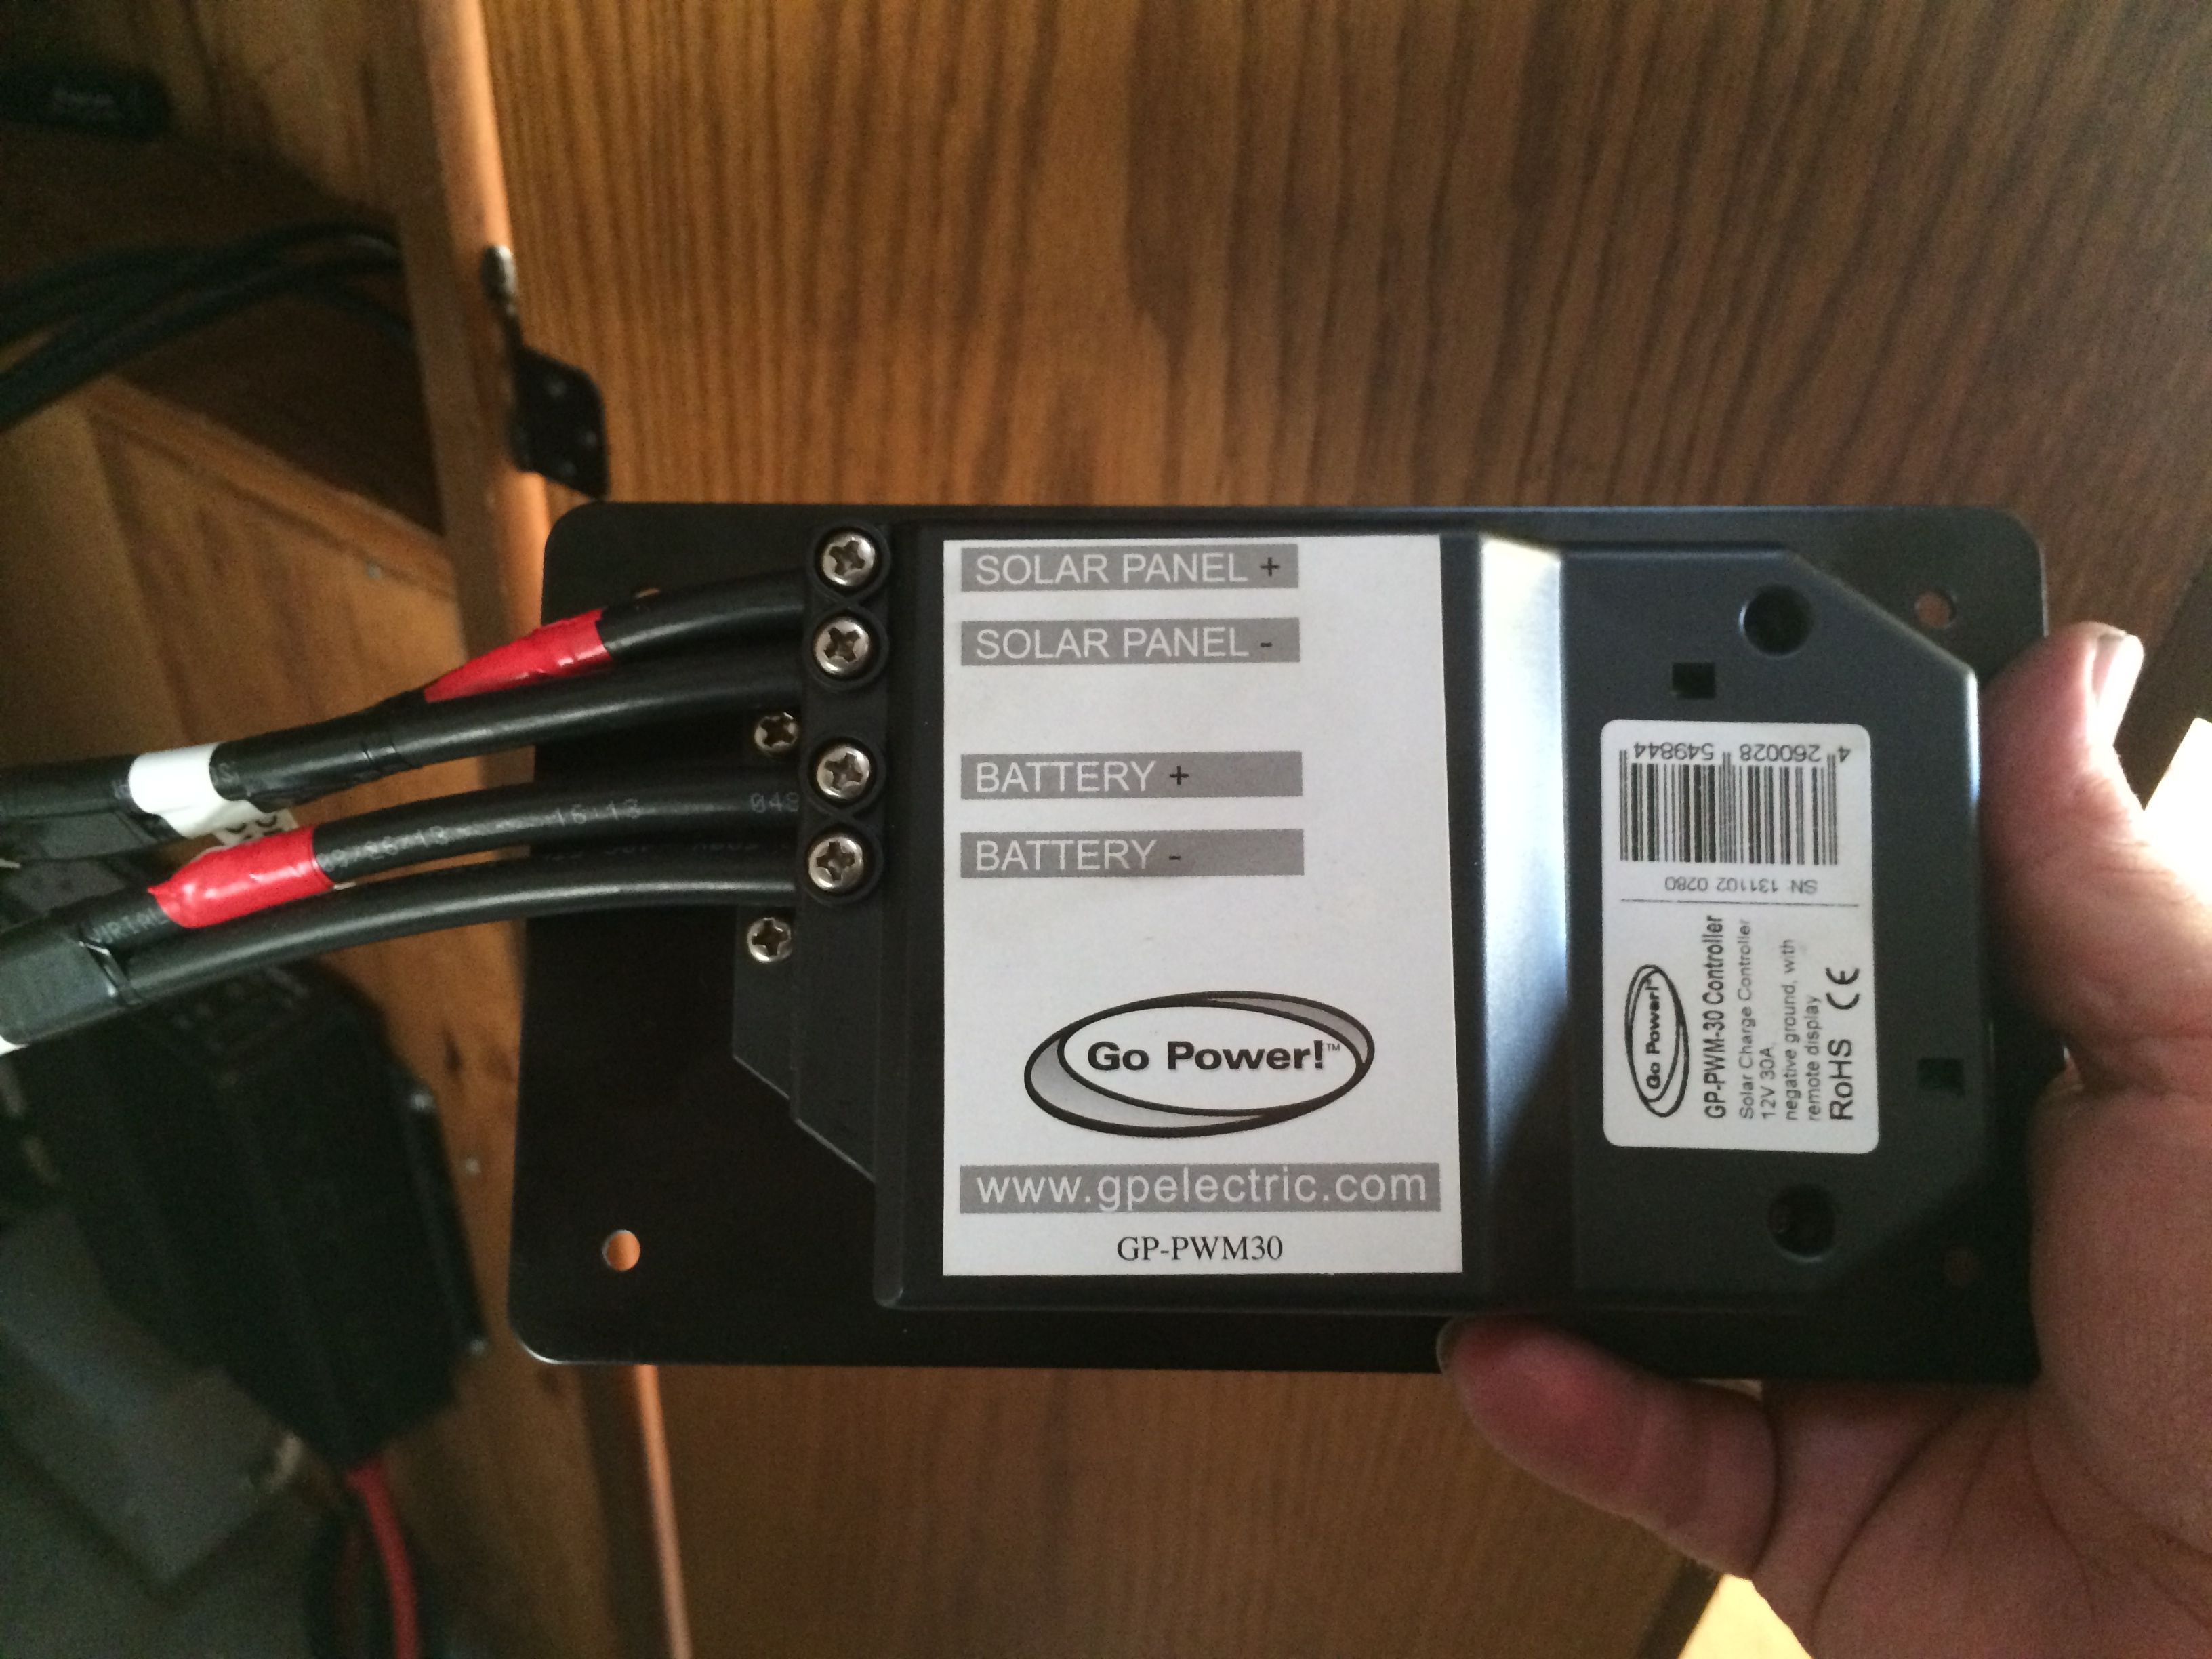 With the controller powered up, and the solar wiring tested for shorts, it was time to head back up to the roof one last time to plug it in.
You are not supposed to connect or disconnect the panels when they are in the sun as they are producing voltage. so I decided to steal my dog’s blanket for a minute to cover the panel. She wasn’t too happy about that! 🙂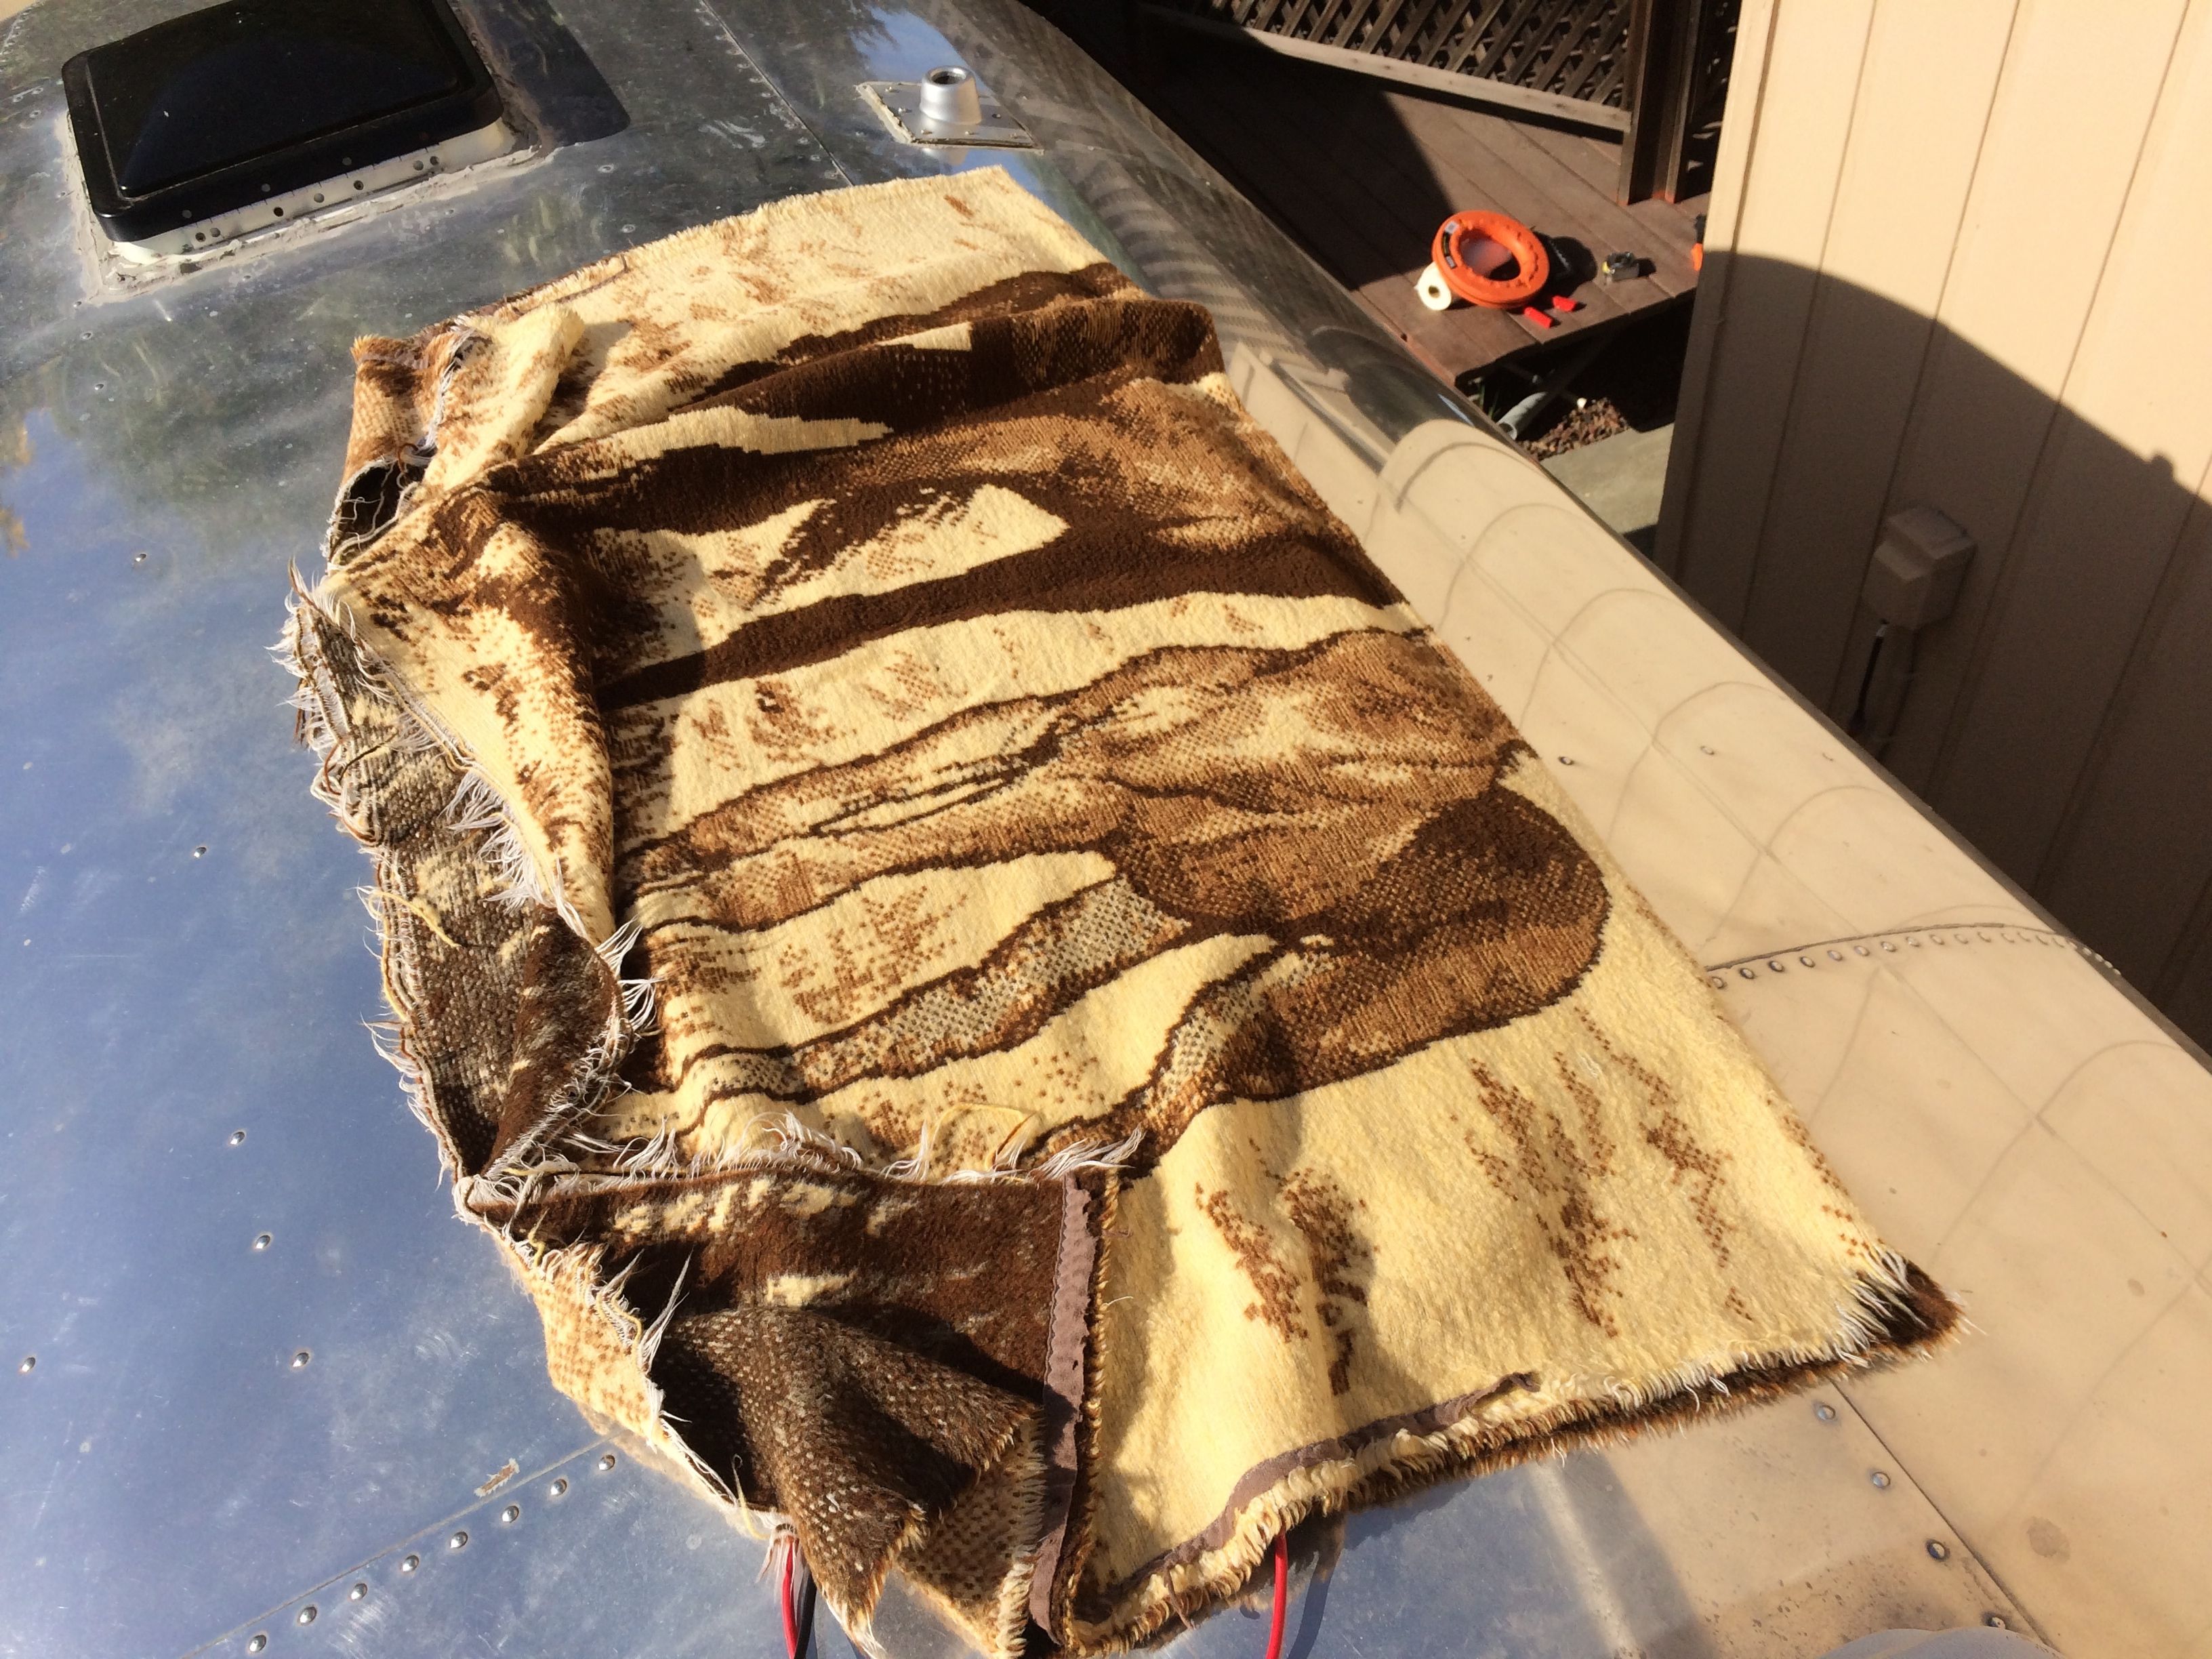 Now it’s safe to plug in the MC4 plugs from the panel. They only go one way and are clearly marked.
Here is a final shot of the roof, with the three remaining panel positions in waiting. 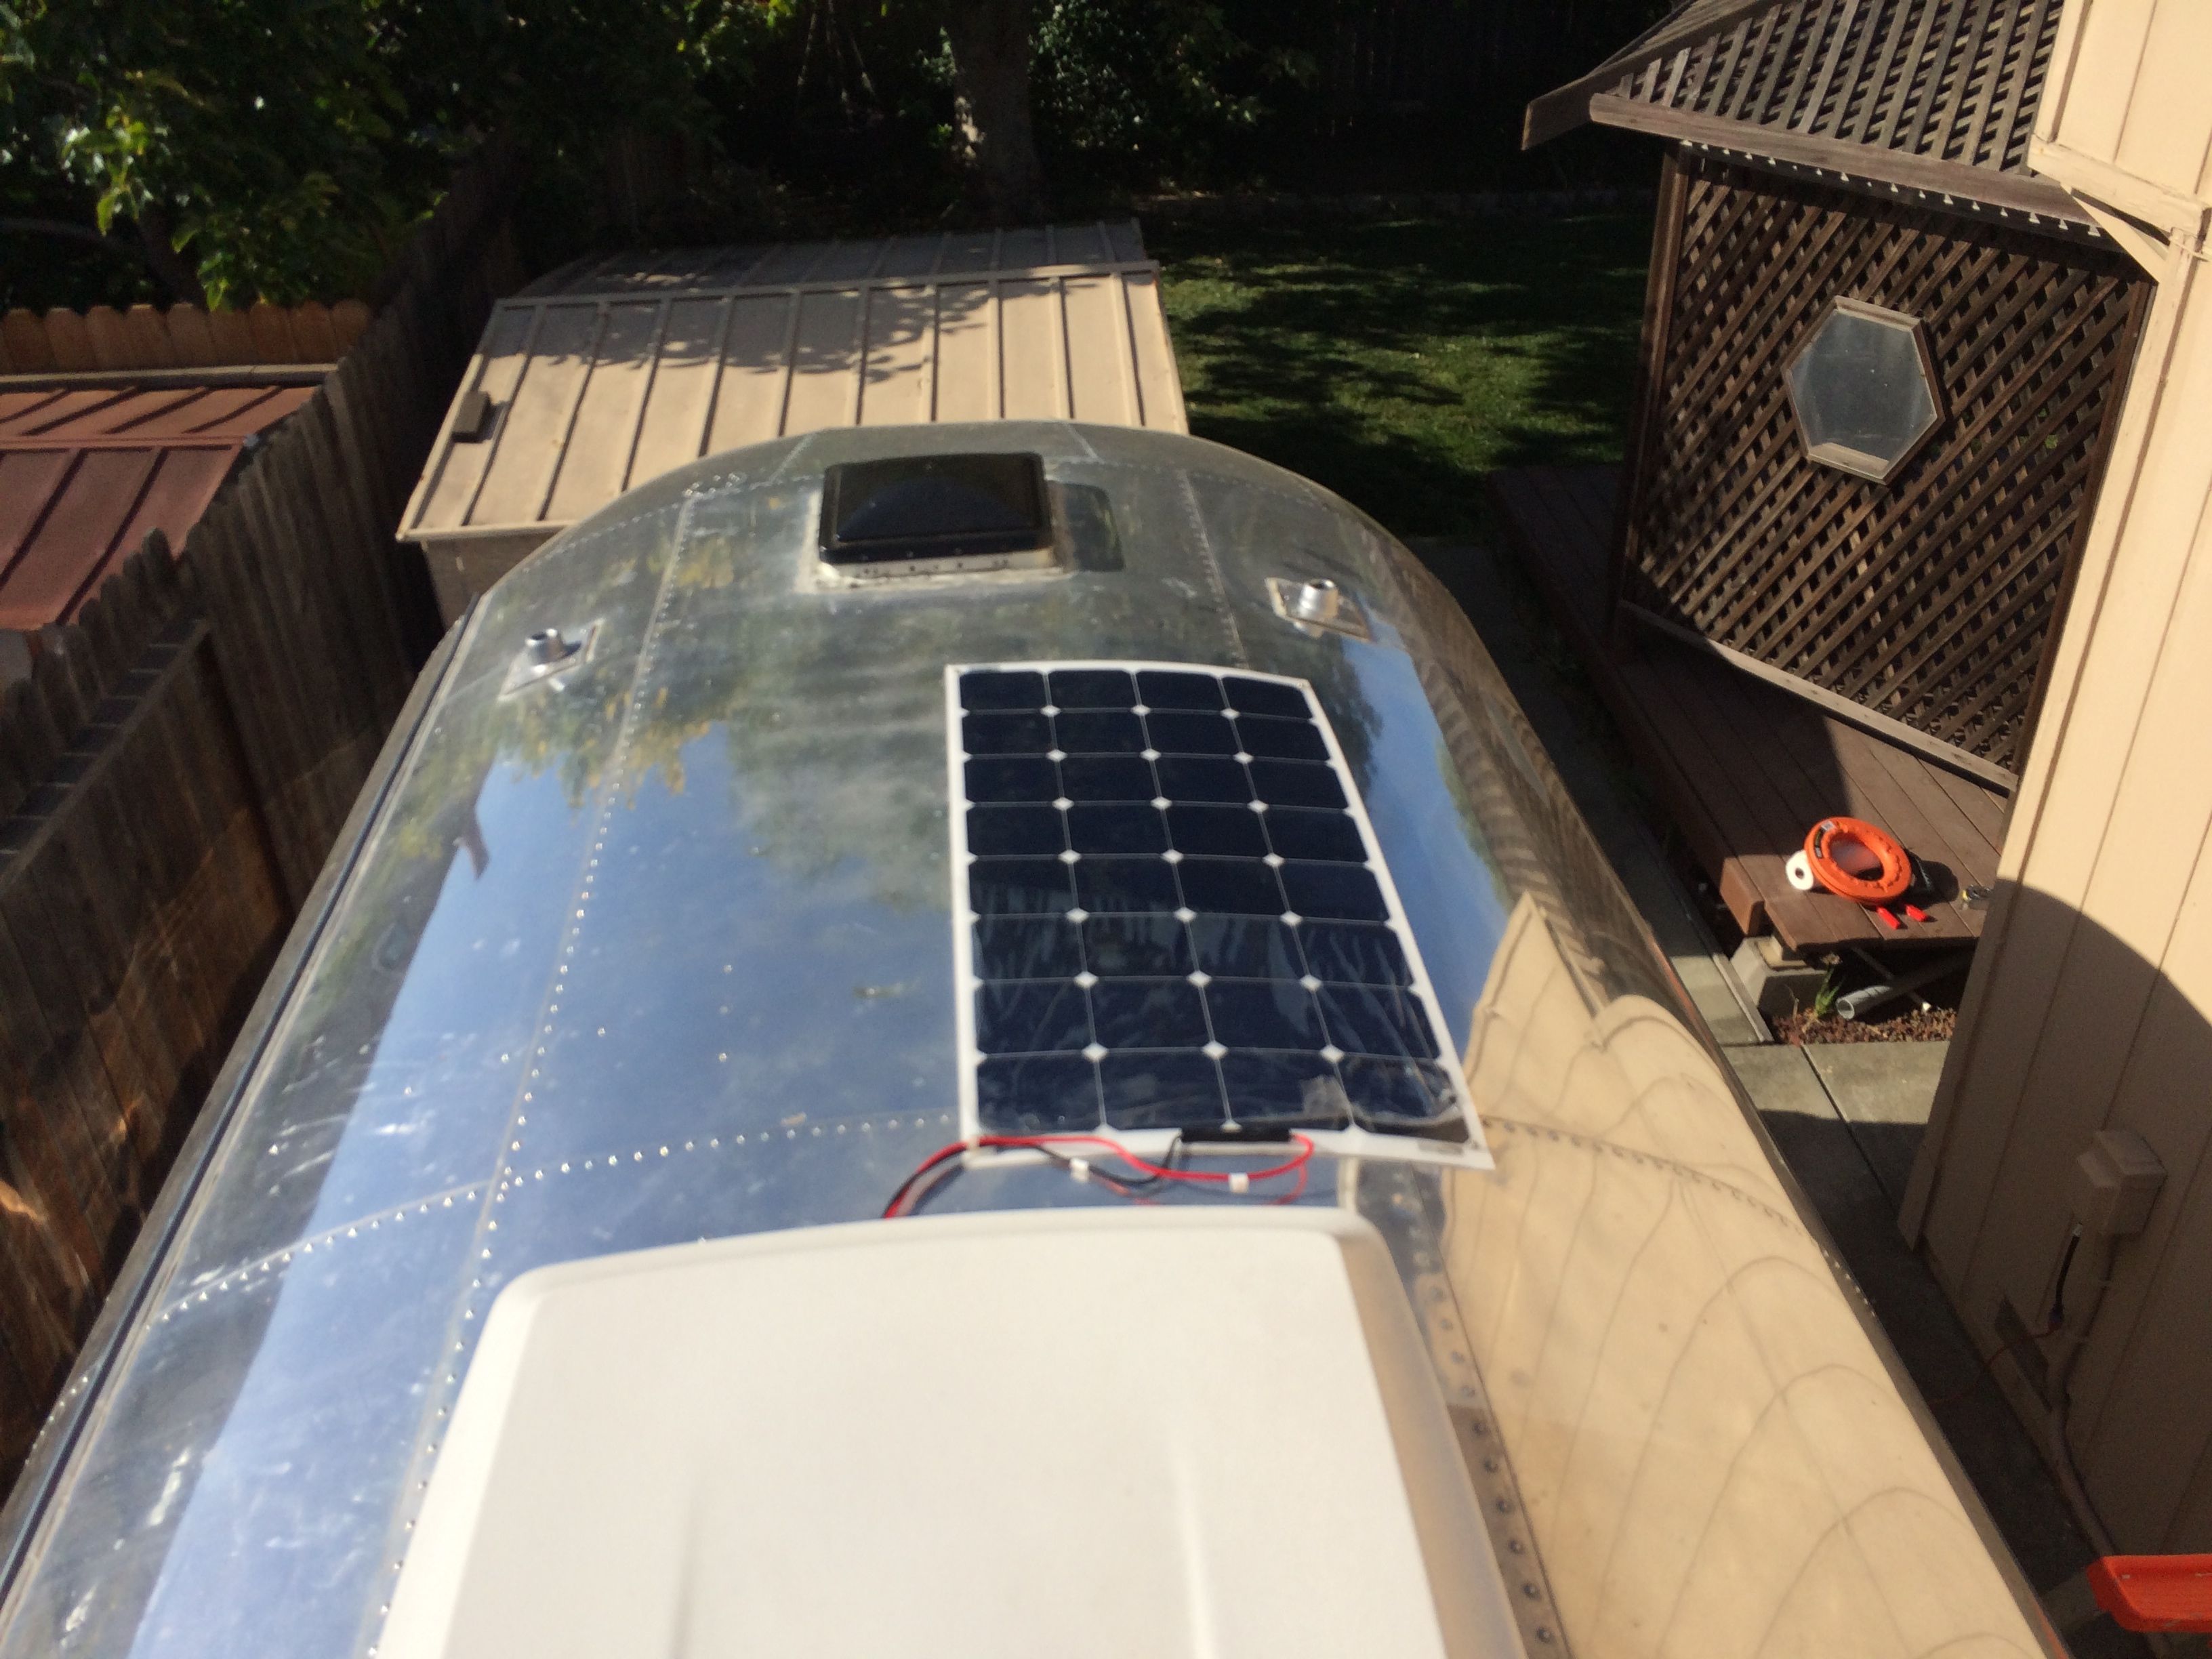 I have two 12v AGM 100Ah batteries for a 200Ah capacity. A very basic rule of thumb is to have one panel per 100Ah. Since I’m going to have 400w, I really should get two more batteries, but I don’t see that happening anytime soon. I really do not have the space for them. My extra capacity will help out in two ways. One, my two batteries will charge up quickly in good sunlight. Second, on overcast or rainy days, I’ll squeeze out more power from my four panels than I would with just two.
By this this time it was about 5:30 pm and the sun was already low in the sky. I also have not removed the protective film from the panel since I will need to remove it to add the 3M VHB. Even so, the controller shows the batteries were charging with two amps. The batteries were fully charged already, and they have no loads right now as I’m rewiring the trailer power.
Here is the solar controller showing the voltage, charge amps, and percent of battery charged. I’m putting the controller in the street side closet so it will be closer to the batteries under the street side bed. I have a Tri-Metric in my pantry that will give me good details on what is going on. I’ll still be able to see the controller whenever I need to.
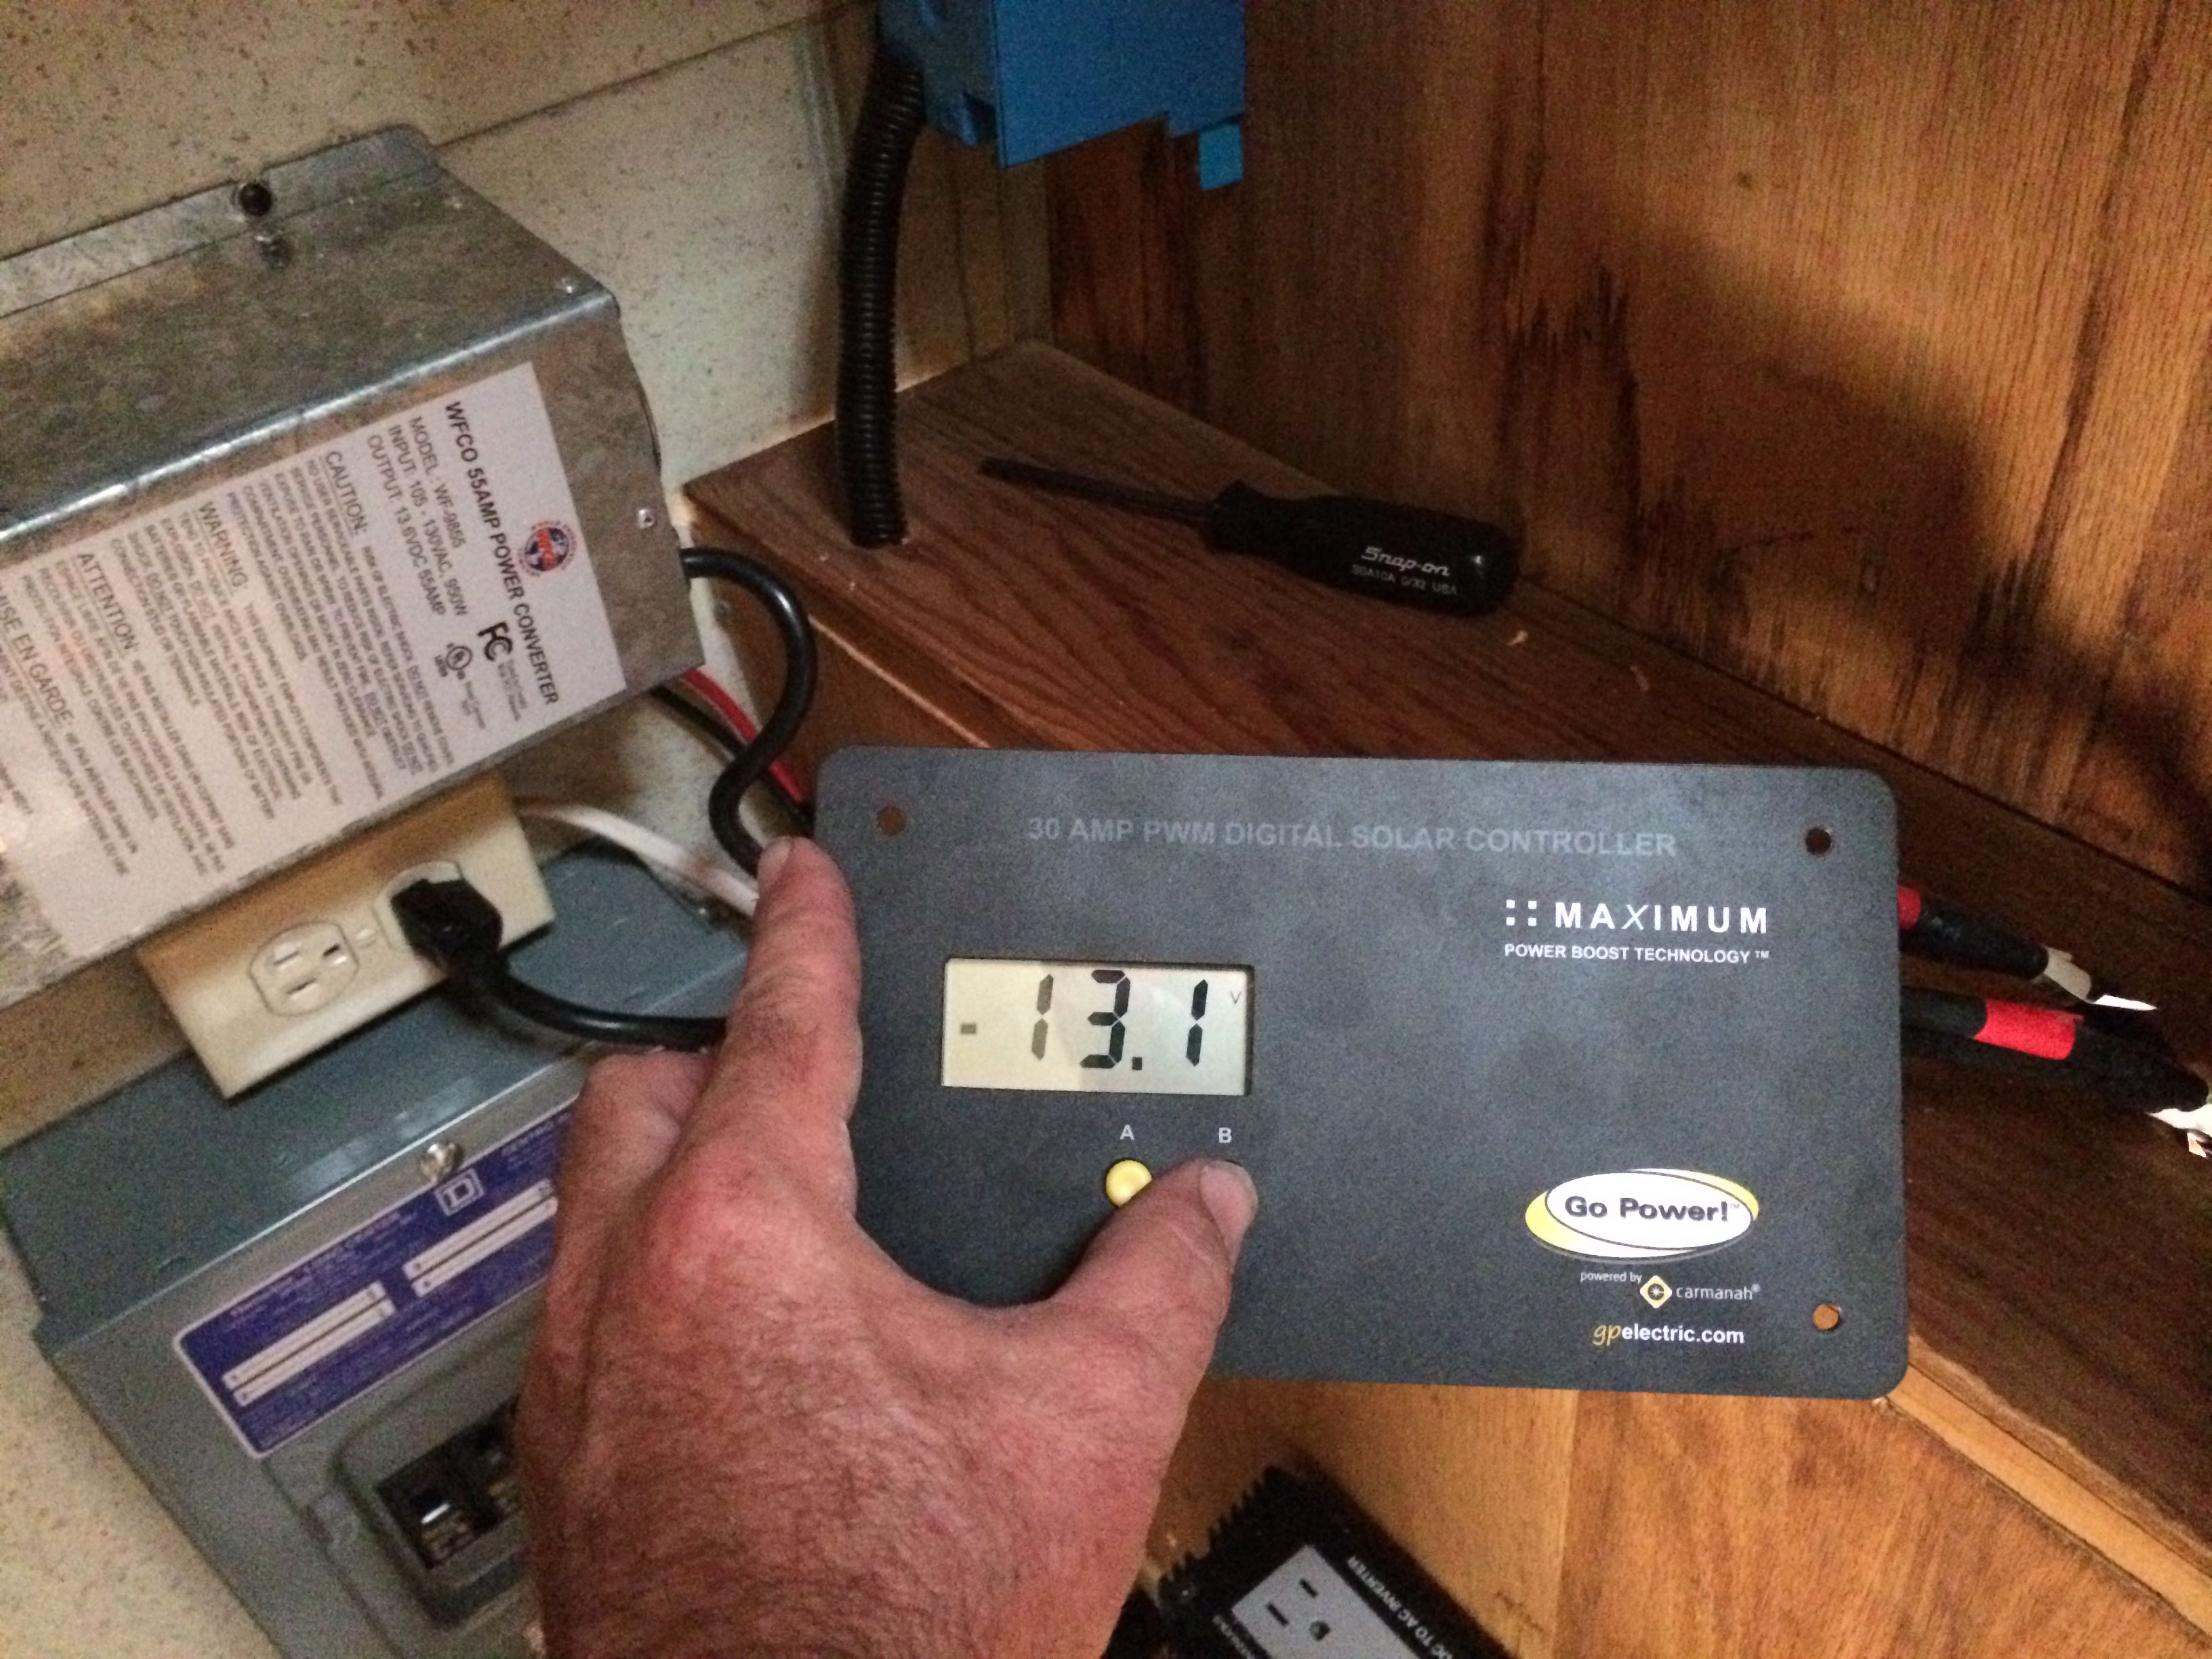
Battery voltage
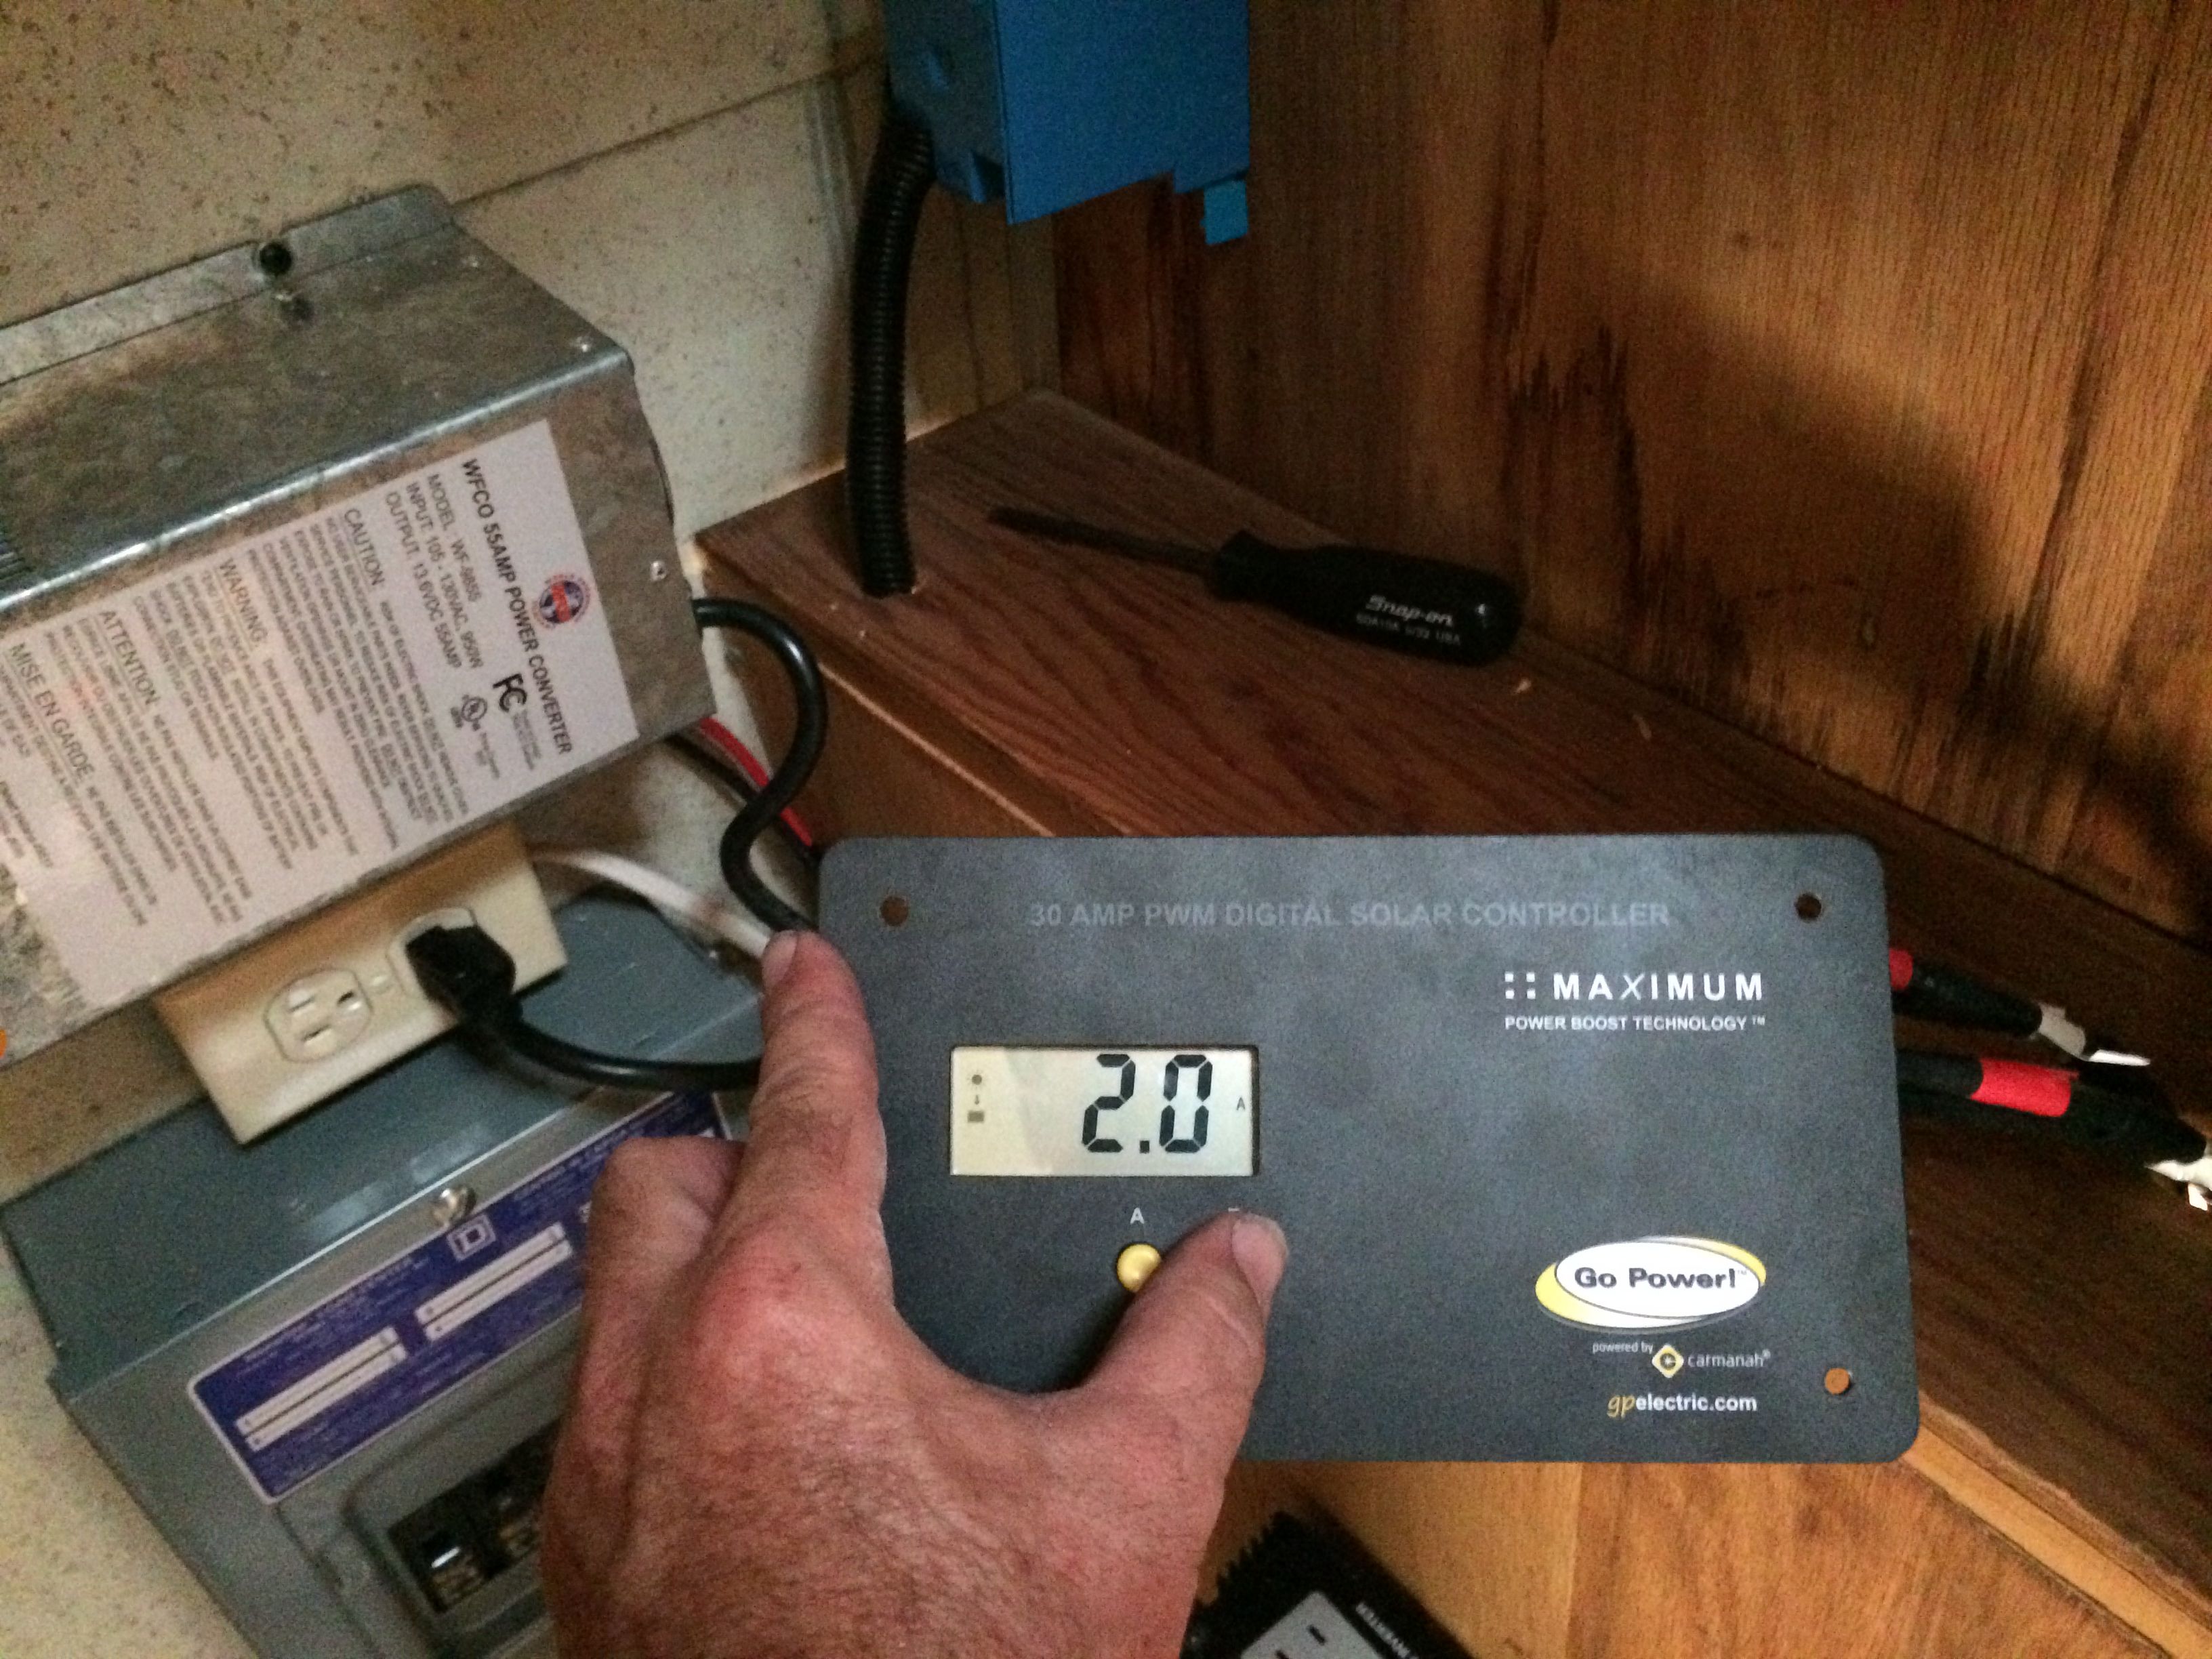
2 amp charge
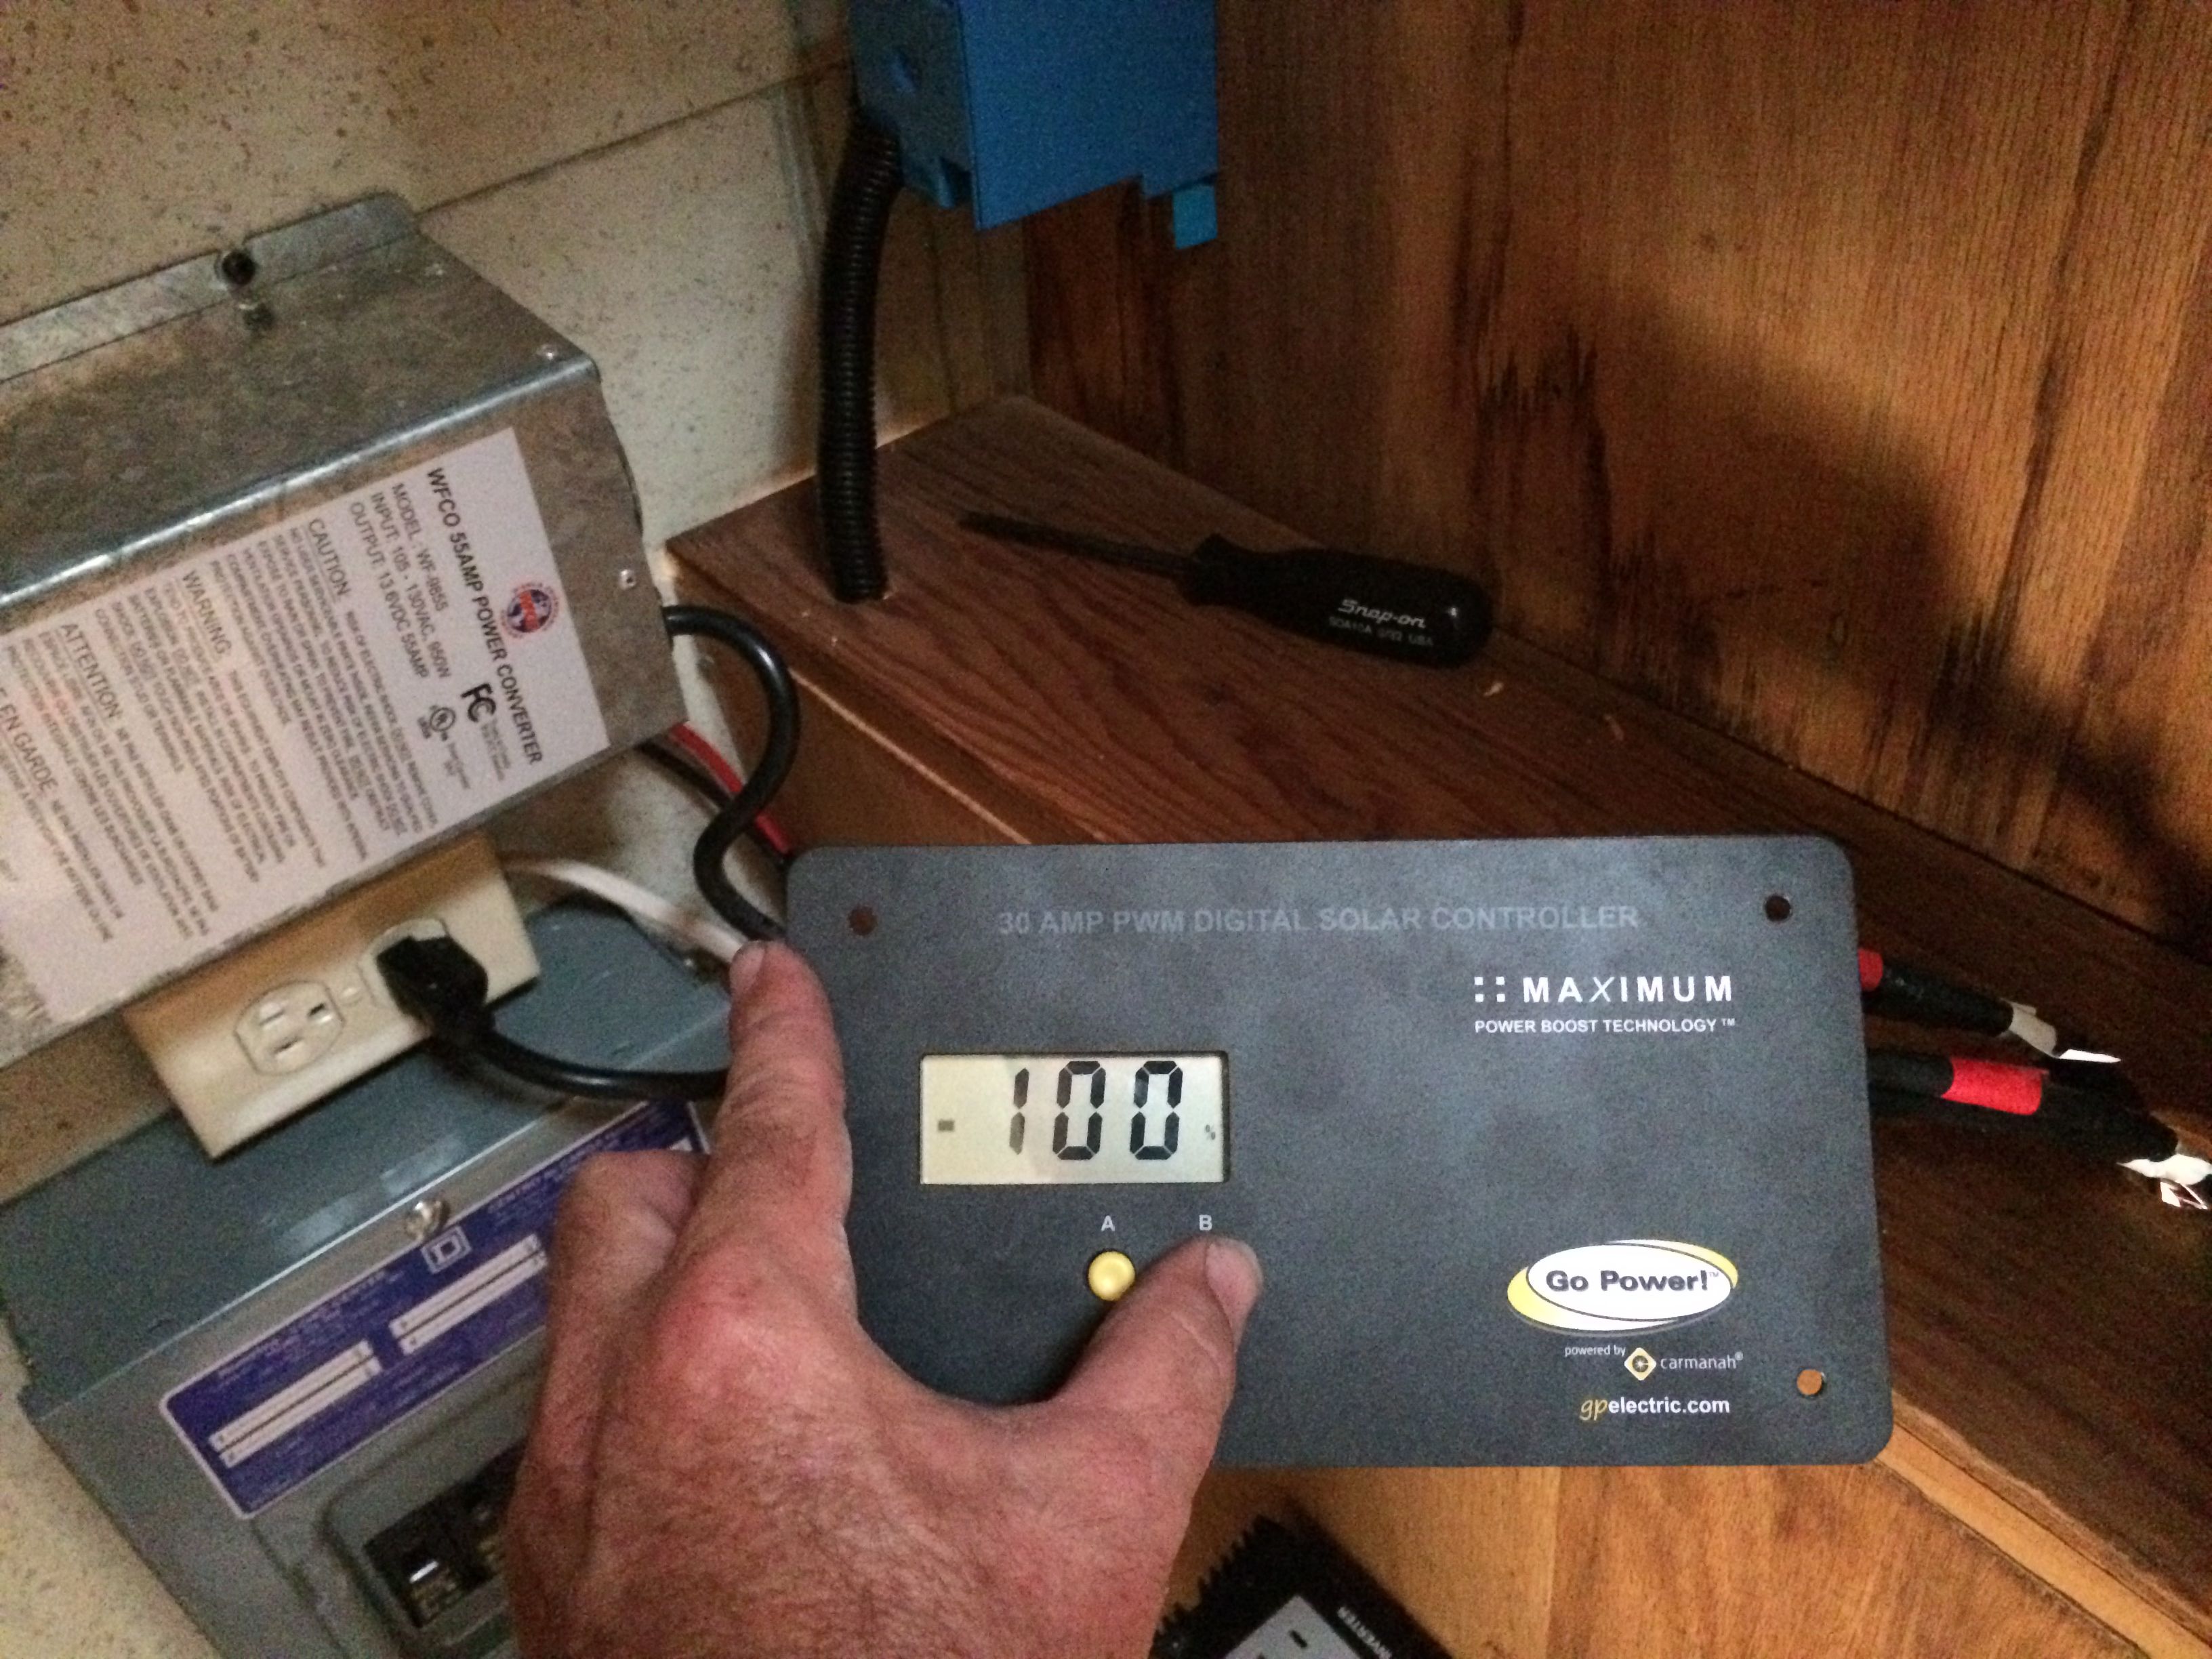
Batteries at 100%
Just for kicks, I checked the voltage from the panel on my bulkhead connectors. BTW with this bulkhead junction, it will make wiring the three remaining panels very easy.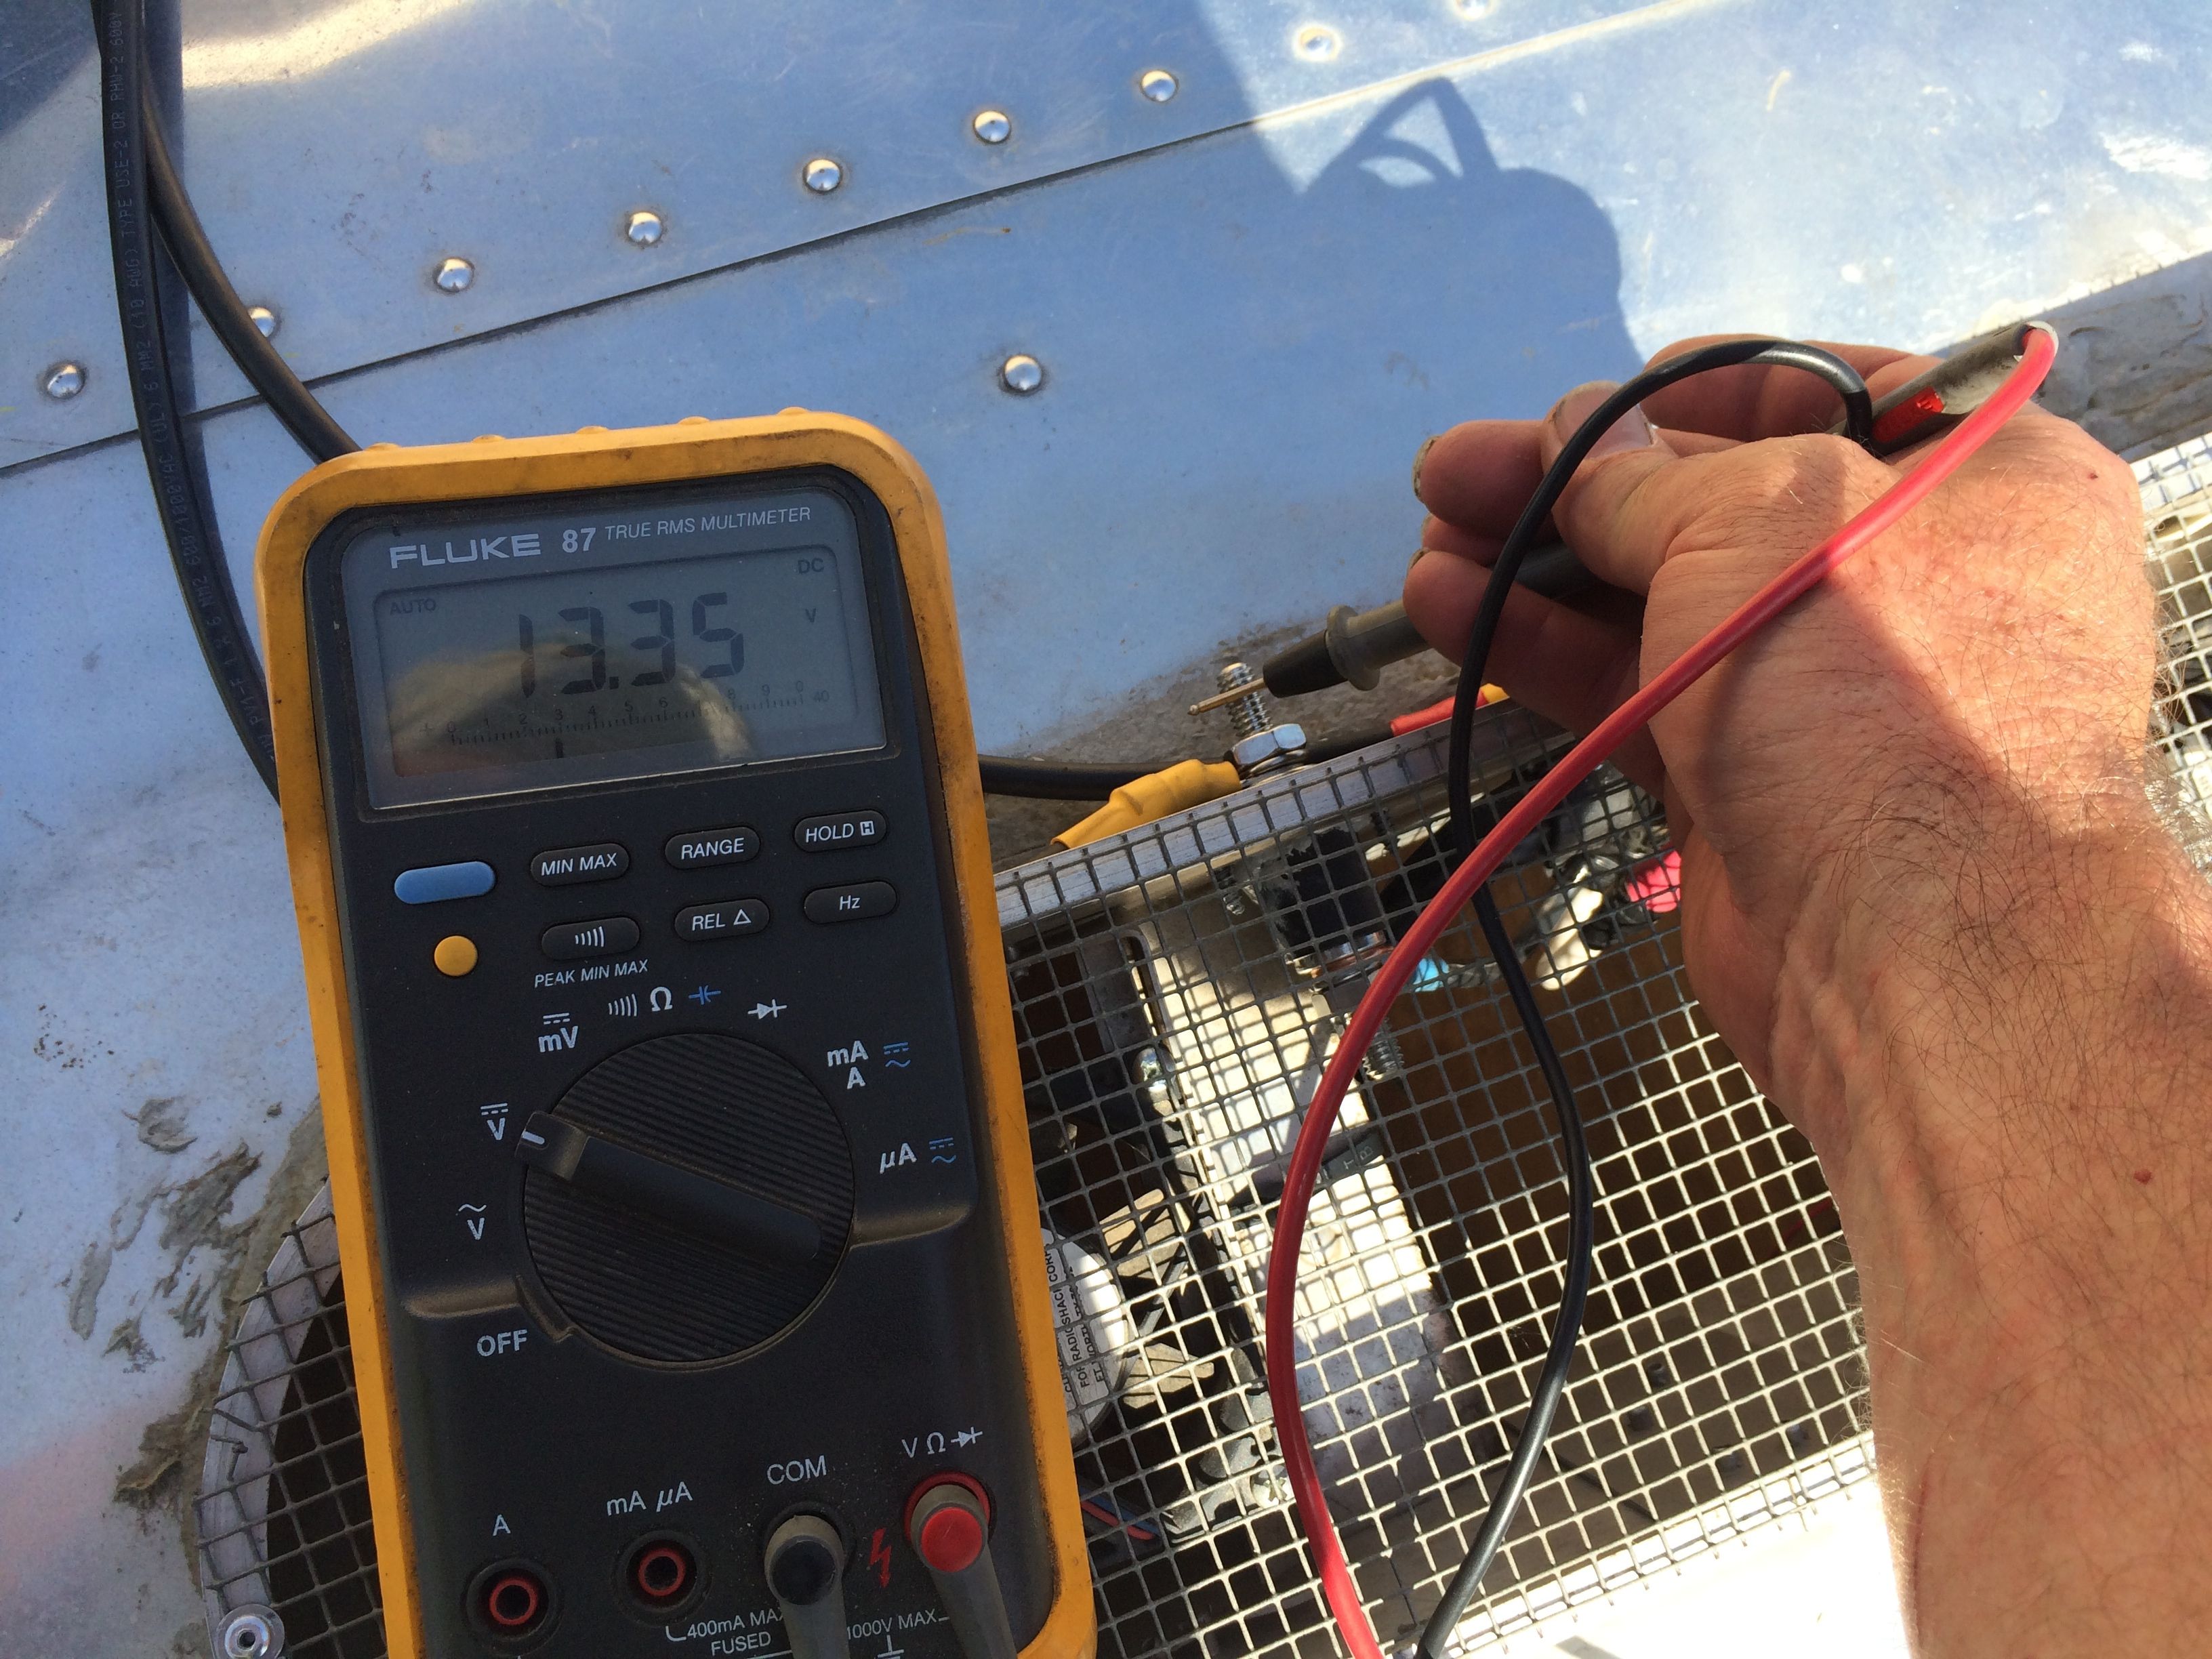 Interesting that it’s 13.35V while providing 2 amps. When I tested it on my driveway with no load, it measured 19.8V.
Ahh, free power from the sun.. That’s it for now, stay tuned for 400w. “Scotty, we need more power!” “I’m giving her all we’ve got, Captain!”
Go to part two of the install
Go to part three of the install
Disclaimer: My solar was sponsored, in part, by GoPower, but the experience and opinions expressed here are my own.


Pingback: RV Wheel Life » Blog Archive » Vintage Airstream expert Tim Shephard shares enthusiasm for flexible solar panels
Pingback: A Do-it-Yourself Airstream Solar Installation with Go Power! Solar Flex Panels | The Snowmads
Pingback: Go Power Solar Flex 500w Kit Installation | 1960 Airstream Ambassador Blog!