Monthly Archives: June 2007

Pro-Pain lines

Some days, it would be nice just to take the trailer somewhere and say finish it. All thats left is the propane lines, disc brake plumbing, and some bellypan. Lots and lots of little finishing stuff too. But those are the major items to get it useable.

Problem is there is no where to take it to. No where I’d trust anyway. So off I go this morning slugging away.

First thing I did was run two more #6 wires in the belly pan from the street closet to the curbside closet. This is in case I decide I need a second battery. Which I probably will. Expecially since I did all the work of running the wire.

Then was putting up a piece of belly pan over the grey water tank. As usual no small task. You don’t want to screw into the tank! But I needed this done before I ran the propane lines.

So here we go.

pict0065001.jpg

You can see I duct taped some of the bubble foil insulation on it first. I figured it couldn’t hurt. It’s just screwed into the crossmembers that surround the tank. I’ll add some rivets as well as soon as they come from Vintage Trailer Supply.

I still have some bellypan in the rear to do, but that will have to wait. We can use the trailer w/o it if needed.

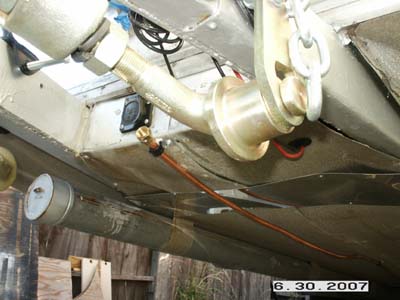
Next up was plumbing the propane. I was going to go back with all new 3/8″ copper. However after talking with Precision Temp about the Jr., they felt 1/2″ would do better. So I ran a 1/2″ main and tee’d off with 3/8″.

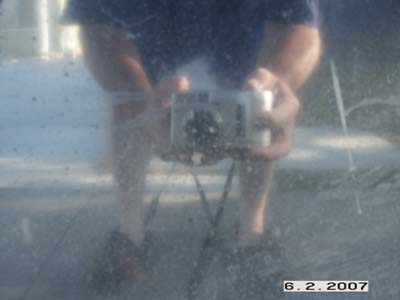
Here is my setup. I borrowed a furniture dolly and taped a rolled up towel for a head rest and now I have an easier way to roll around under the trailer. I had my copper, flairing tool, bender, and fittings ready to go.

pict0066001.jpg

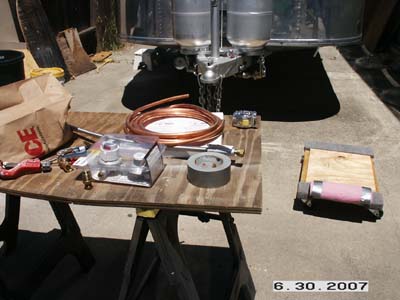
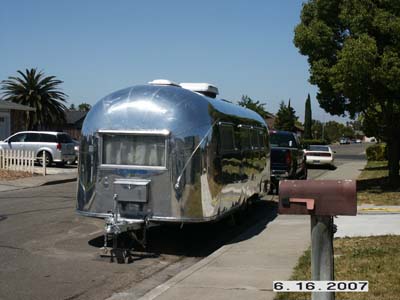
It’s amazing this stuff takes all day. It always does. And yes I forgot the polsih my new Worthington aluminum tanks. Oh well….

I already had the fridge, Jr., and stove top, stubbed out to the botton of the trailer using 3/8″ lines. So I just had to run the main and tee off as needed.

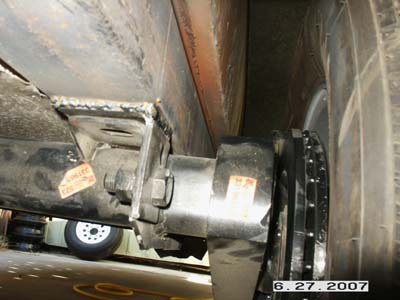
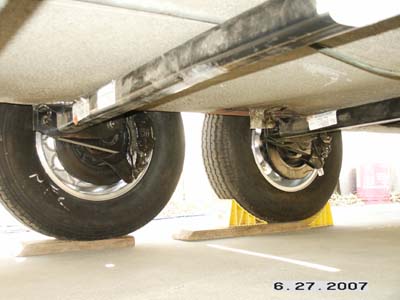
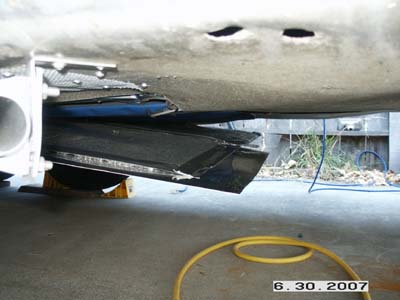
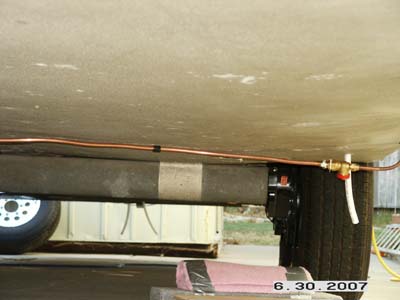
Usually on torsion axles, which I have now, the propane lines are nicely bent under each axle beam. With my cheap wire bender, I could not do it. I did have enough room to fit my 1/2″ line between the axle beam and the bellypan, with less than a 1/8″ to spare. I don’t think those beams will flex going do the road and smash my lines…. will they?

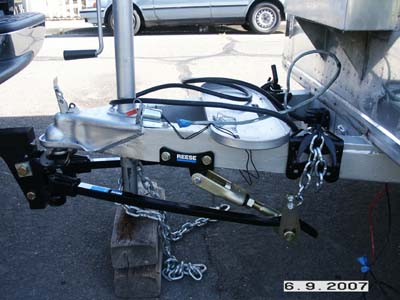
I’m just short a couple of adapters to the regulator. Perhaps if I have time tomorrow I can pick them up and check the system for leaks.

Here are some photos.

pict0067001.jpg

pict0070001.jpg

pict0069001.jpg

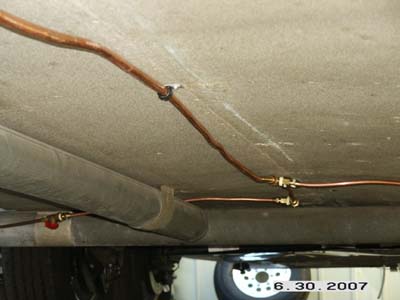
I forgot the mention that I did put shut off valves on everything under the bellypan. So I can turn each item off if needed.

One more thing. I removed all the original propane lines and folded them up and put the aside. Then I noticed some black goo pouring out of them. It was a deep black oily mess. Yuck! I’m glad I did not try and reuse them on my new appliances. Be warned….

Well, thats it… See ya next time….

Facebooktwitterredditpinterestlinkedinmailby feather

Axle order

As promised here is the actual order information I used.

Dexter is very flexible on their axles. You can get a number of different sizes, weight ratings, spindles, brakes, mounts, everything. And their engineering department is nice to work with after you’ve educated yourself a bit.

Goto Dexter’s website and read up on axles and how to measure before you call so you have something to discuss. After you have your questions answered and you’re comfortable with the terminology then you can head to a Dexter dealer and ask for what you want.

Here is a nice Dexer resouce on axle measurement.

Here is the order form I used.

dexter_order.jpg

Here are my specs:

#10 Axle w/camber
Hubface: 75.38″
Hydrolic Disc brakes
“A” Spindle
EZ-Lube
6-5.50 hub
32 degree down trail
RC 3000lbs
Low Profile Reverse mounting brackets
OB 58.38″
Side mount hangers

#10 axle is their specification for the size. Normally their #10 axle comes with 5 bolt pattern hubs. Airstream uses 6 bolt hubs. So I specified the Type “A” spindle which increased the size of the brakes/spindle, and allowed for the 6 bolt hub.

Hubface is the distance between hub to hub where the tires bolt to.

6 on 5.5″ spacing is the wheel bolt pattern

32 degree down trail is the start angle on the torsion arm. Usually Airstream uses 22.5 but I wanted a little more height.

RC is the weight rating of the axle. After weighing my trailer, 4100lbs w/o the AC, couch, or water tank, I decided on a total capacity of 6000lbs.

Low profile reverse brackets. Dexters standard mounting bracket is exactly opposite of what Airstream used on their torsion installations. By specifying reverse mount, side mount, you can get the brackets that will be in the right spot to bolt to your axles. (not that the holes will line up though)

OB, Outside Bracket. This is the outside frame to outside frame measurement.

Keep in mind, this are MY measurements and specs. Yours WILL BE different. I just wanted to post this so that you can be armed with a little more information when you are working with your Dexter dealer.

Facebooktwitterredditpinterestlinkedinmailby feather

Axles Installed!

It’s been a long time in the works. But the leaf spring to torsion axle conversion is finsihed. Talk about a stressful job.

A lot of unknown’s here. We had to measure for the axles, widen the hubface (wheel mount to wheel mount measurement), and of course the new aluminum wheels from Trailer Tire and Wheel Supermarket, a VAP Contributor. Wheels have different measurements and offsets, things I had no idea about and had to learn.

Going from a leaf sping axle to a torsion is no small task. It requires custom fabrication and lots of patience.

The axles are Dexter TorFlex with disc brakes. Dexter contributed them to the project. After a lot of talks with their engineering department, Colin of GSM Vehicles, and my buddy Uwe who put Dexter axles on his trailer, I was able to get some specs that I was comfortable with. Comfortable, but not exactly 100%.

I had them shipped directly to my welder who agreed to do the job. And a job it was. First the trailer had to be supported by the frame. No small task on an Airstream. The old axles and springs removed and hauled off. Airstream frames of this time, 1960, are very thin walled, less than 1/8″. Add the unknown of rusting from the inside out and you have a difficult situation. How do you weld two new axles on this very old frame rail.

After much discussion with Colin, RJ, and Uwe, and my welder, we opted to weld a 1/4″ three foot long angle iron to go across the bottom of the frame rail and up the outside. It was thought that this will help distribute the load along a greater distance and give a good welding surface for the axle mounting brackets.

Here is shot from the streetside looking back. You can see the angle iron welded to the frame.

pict0057001.jpg

Next is a shot of the welding of the axle mounting bracket that comes with the axles.

pict0058001.jpg

Here is another shot from the streetside front looking at the curbside.

pict0059001.jpg

Here is a shot of the wheel well on the streetside. Note the new aluminum wheels.

pict0055001.jpg

I did gain a lot of height like I wanted to. It must be about 3-4 inches higher now. I was nearly rubbing the driveway and curb with the plumbing and such backing in. Also my drop hitch had to be so low that it would drag as well. So I purposely ordered the axles with an increased down angle of 32 degrees. Of course I did not count for the included 1/4″ mounting bracket or the added angle iron 1/4″, so that added another 1/2″. It looks good.

In the photos I put the wheels on some boards to gain more room as I’ll spend the next few weeks under the belly replacing belly pan, running hydrolic brake lines and propane lines.

No, I did not install shocks. Airstream includes shocks on their trailers even with torsion axles. They are a desired feature. After much thought and discussion, I opted not to. Most of the axle industry using torsion axles do not put on shocks as the rubber in the axles absorbs the road shock. There will forever be much debate about this. Changing over from leafspings was enough trouble for me w/o worring about shock mounts. You’re mileage may very.

I’ll post my exact ordered axle specifications on the next post and try to explain some of them for those brave souls who venture into this themselves.

One last item. My welder was able to fabricate some bunk bed brackets I needed off a diagram provided to me from a good internet buddy Jim. Thanks Jim!

pict0063001.jpg

I really have my work cut out for me. Down to the wire with only a month of no school time to use the trailer… nothing like pressure…

Facebooktwitterredditpinterestlinkedinmailby feather

Couch mounted…

If you look at the June 12th entry you can see along the wall some plumbing and wiring that needed to be covered up. Believe it or not, originally there was a water pipe running along the base of the wall as well. They covered it up with a decorative screen just pop riveted in diagonally from the wall to the floor.

I decided to do it a little more difficult :-).

pict0043001.jpg

With that done I was able to use some wood lag screws to secure the couch. So now that its all screwed down I thought that I would show you how it makes into a bed.

First you remove the arms and back cusions.

pict0045001.jpg

Next you pull up and forward on the black handle. That causes the back to slide down to make the foundation for the rear part of the bed.

pict0046001.jpg

Now the three cushions that you sit on are actually all connected together as one peice. The simply fold back and create the mattress. Note the drop down legs at the front. I really like that. I’m sure we’ll be sitting on the edge of the bed, or the kids jumping on it and I won’t have to worry about a leverage problem with the mounting. A nice touch.

pict0047001.jpg

Its a nice sized bed ready to use. It measures 51″ wide x 74″ long. Just under a standard queen. Not to bad.

Here is another shot from the doorway.

pict0048001.jpg

As you can see, even when the bed is out, it does not block the doorway at all.

Now I need to figure out some kind of dinette table. It will either be a free standing with flip down sides or a wall unit that folds out….

Facebooktwitterredditpinterestlinkedinmailby feather

Waxed and ready… well almost

70 hours. Done! I’m finally done with the polishing for at least a year. And boy am I glad. You may be asking done at 70 hours, I heard it takes at least 150 – 200 hours. I’m not saying its the best polish job in the world. I’m just saying its done :-).

pict0033001.jpg

pict0034001.jpg

pict0035001.jpg

pict0036001.jpg

New tail light lenses and nameplate reproductions add a nice touch.

pict0037001.jpg

pict0041001.jpg

So, how did I do it in 70 hours. First off you have decide if your polishing for speed or perfection. You have to pick one or the other. If you choose speed read on.

This is the second trailer that I polished. The first one I tried to polish it perfectly and took 150 hours doing so. Then the first time my daughter grabbed the wire brush to help daddy clean the trailer….. There was also one of the camping trips when the oldest son used the trailer to stop his bicycle… I learned quickly that a perfectly polished trailer does not go with a young family actually using the trailer for everyday camping.

So keeping it perfect is a problem. Lesson one. The next lesson was that each year when you do the touch up. The polish gets better. So I know that each time I touch it up, it will look better.

On this trailer I took a speed approach. I needed to get it done because polishing was just one of the many things I need to finish in hopes to use it this year. And secondly the summer heat is here. The last few days I could only polish from 7am – 10 am. Then it was too hot.

Like I said, my trailer is not perfect. There are still some intense swirls from the compounding. Lots of badly corrioded panels that would have to be replaced to get right. Hey its been outside in the sun for 47 years. Get over it! How would you look after being outside for 47 years?

Realizing that, here is my speed polishing list.

1. Use a more aggressive polish. I used G6.
2. Set a limit over the number of passes over the same spot. I choose three. Use agressive enough polish to get the desired corrosion.
3. Go over as large an area as you can reach
4. Live with panel/corrosion imperfections
5. Cyclo with F7 then S then stop. Realize it will get better with each year’s touch up.
6. Remember, there is always a shinier trailer than yours….

Now I did try something different on the street side. I did one pass with Nuvite F9. The most aggressive grade. The followed up with two passes of G6. Unfortunately this left swirls to deep for the cyclo. So next year, I’ll have to compound with C or something finer during my touch up. But it won’t be near the work it took to get it here.

Like I said, I won’t be entering any contests. But it looks great from the next campsite over….

Facebooktwitterredditpinterestlinkedinmailby feather

Couch is here!

Man it’s getting hot. Over 90 degrees today. No time to polish. Its after 8pm and it’s still over 80.

I did get about 5 hours yesterday. Four before work and one hour in the evening. That brings me to a total of 60 hours. I have everything but the very front under the original battery box compounded. I’ll be getting up early tomorrow and try and get a head start. I’ll compound that area a little, but its pretty badly corroided. I need to move on to the quickie cyclo job to get done for the season.

pict0028001.jpg

The new couch/gaucho showed up today by freight truck. We ordered it about six weeks ago. So if you intend to order one thats how long it takes. My dad came by and we dry fitted it in the trailer.

pict0030001.jpg

The flash kinda washed it out, but it looks nice.

pict0032001.jpg

When it opens to a bed, it come up just to the right hand side of the door opening. So it doesn’t block the doorway at all. I like that. Tonight I lined it all up and pre-drilled the mounting holes in the floor for the lag bolts. But I didn’t fasten it yet. I have some trim work to do first on both sides of the couch.

I also added the strap hardware for the LCD TV’s so they can be velcro strapped in place during transit.

pict0031001.jpg

Thats it for now. Hope I can get up early to polish. Weather man is forcasting over 100 degrees over the next several days….

Facebooktwitterredditpinterestlinkedinmailby feather

55 hours and 85 degrees

I have the entire street side compounded between endcaps now. I have to sneak a few hours in before the heat comes. Once it hits over 80 the party is over :-(. The polish just begins to turn into a powder.

So after about four hours this morning, I finished up everthing except the street side quarter panels and the front lower section. After that, just a quick once over with the cyclo and I’ll be done for this year on the polsihing. I estimate about another 10-12 hours.

pict0026001.jpg

While it was too hot to polish, it wasn’t to hot to install the Reese weight distribution hitch and high performance dual cam sway control. I still need to adjust everything, but the hard part is done.

pict0027001.jpg

Facebooktwitterredditpinterestlinkedinmailby feather

46 hours and counting

Put six more hours in today. Makes a grand total of 46 hours.

Yesterday I turned the trailer around so now I have the street side against the curb. I was able to get the front endcap compounded with G6. I was also able to get the street side above the window line up compounded.

After that it got too hot and the polish started turning to powder. Today was the first day I had to work in direct sunlight and it hit 80 degrees. Much to hot to be doing this kind of work outside. After you clean a spot, the sun reflects right back at you… progress? 🙂

pict0023001.jpg

pict0024001.jpg

pict0025001.jpg

Facebooktwitterredditpinterestlinkedinmailby feather

OPD

Do you have OPD? No, not Overfill Protection Device on your propane tanks. I’m talking about Over Polishing Disorder.

Top 10 signs you have Over Polishing Disorder

10. When you go camping you pack the cyclo first
9. At rallies you bet your roof is shiner than anyone elses trailer
8. When you call Tom at PerfectPolish.com you ask for the usual.
7. The “usual” is three pounds of Nuvite ‘S’
6. Tom knows you by name, and your shipping address
5. You have to bring extra sunglasses for those camping near you
4. After 14 passes over the same spot, all you can say is “It’s getting there…”
3. You think silently, polishing the bellypan really wasn’t *that* hard
2. You actually get offended when someone uses the vanity mirror
1. You remove the vanity mirror

36 hours and almost half way there. I went ahead and cycloed the curb side. First with F7 then followed up with S. I got to tell you that cyclo uses a whole new set of muscles than the compounder!

So, the curbside, between end caps is done. Because of my OPD I may go over it with the cyclo and a clean wrap. Otherwise its on to the front and back. Then I’ll be turning the trailer around and starting on the street side.

pict0020001.jpg

pict0021001.jpg

pict0022001.jpg

If you’re keeping score at home, I’ve gone through 1lb of F7, 1/2 lb of G6, and 1/2 lb of F9. Like I said before, my main work horse polish is G6. Its working great for me. I think its because of the clearcoat on the trailer allowing for the deep corrosion. If you don’t have clearcoat you could start with F7 for compounding. Otherwise, G6 is the ticket!

Facebooktwitterredditpinterestlinkedinmailby feather

I got an idea.

Eight hours of polishing today. That’s right, I’m a polishing machine. Or a nut….

I had a nice visit from Tom Numelin of PerfectPolish.com. Tom knew I was running out of Nuvite and decided to drop some by. How’s that for service! Thanks Tom. Really saved the day and let me put in these eight hours.

Someone asked for a couple of photos of the corrosion I have on the trailer. Here are two of the most stubborn types.

pict0016001.jpg

pict0017001.jpg

These are tough. Requiring 7-10 passes of Nuvite F7. A real chore. Tom dropped off some course grades G6 and F9. The G6 has a nice property where as its being used it drops its roughness down to an F7. Starts out course and gets finer. I found this is what I needed. I was able to get through in about 3-4 passes with the G6.

The F9 is reserved for really bad stuff like you see above. It works wonders on it requiring only a couple of passes. But it stays course, so you need to follow up with F7 so the cyclo can clean it up in the final process.

Enough talk… I basically got the curb side done from the rear to the left of the main door. Here are the photos today. This is after 27 hours.

pict0015001.jpg

pict0018001.jpg

pict0019001.jpg

I actually got a lot farther than I thought. When I get some time, I’m going to try the cyclo over those areas I did with the G6. I’m curious if it will clean it up w/o needing a finer grade compounding.

Oh yeah, my idea. You know the polish will really look good if people have something to relate it to. What if I only polsih the curb side so anyone seeing the trailer can see what it looked like before?…..

Anyway, thats all for today. And it’s enough!

Facebooktwitterredditpinterestlinkedinmailby feather